A Detailed Overview Of 802.1X Network Configuration
802.1X network configuration enables organizations to control network access by requiring users and devices to authenticate before connecting to wired or wireless networks. It works with technologies such as Extensible Authentication Protocol (EAP) and RADIUS to verify identities and enforce network access policies.
Configuring 802.1X involves multiple components, including the authentication server, network devices, and client endpoints. The configuration process varies depending on the network environment and authentication method used.
This guide provides an 802.1X authentication step-by-step walkthrough, including how to configure a Windows Server 2019 RADIUS server and connect it to your network.
What Is 802.1X Network Configuration?
802.1X network configuration is the process of setting up port-based network access control so that users and devices must authenticate before gaining access to a wired or wireless network. It typically involves an authenticator, RADIUS server, and supplicant, along with an authentication method such as EAP-TLS (Extensible Authentication Protocol-Transport Layer Security).
For enterprise Wi-Fi, 802.1X is commonly used with Wi-Fi Protected Access (WPA) and Wi-Fi Protected Access 2-Enterprise (WPA2-Enterprise) to provide individual authentication for users and devices.
Unlike WPA-PSK (Pre-Shared Key), where multiple users share the same Wi-Fi password, enterprise authentication allows organizations to authenticate users or devices individually through a RADIUS server.This approach gives administrators greater control over network access, enables centralized authentication, and makes it possible to apply access policies based on the authenticated user or device.
Info: With certificate-based authentication such as EAP-TLS, devices can use digital certificates instead of passwords, helping reduce the risks associated with shared credentials and credential theft.
802.1X network configuration can be used for both wired and wireless networks. Depending on the deployment, it can also support capabilities such as network segmentation and VLAN assignment based on authentication and access policies.
The diagram below illustrates the components of 802.1X:
![Diagram showing two supplicant devices connect through an authenticator, which links to a RADIUS server and to the internet.]](https://cloudradius.com/wp-content/uploads/2023/03/The-Components-of-802.1X-1024x430.png)
802.1X involves three primary components that work together to verify a user’s or device’s identity and control access to the network:
- Supplicant: The supplicant is the user device, such as a laptop, smartphone, or other endpoint, that requests access to the network. It provides the credentials or authentication information required to verify its identity.
- Authenticator: The authenticator is the network device that controls access to the network, such as a wireless access point or network switch. It acts as an intermediary between the supplicant and the authentication server and allows network access only after successful authentication.
- Authentication Server: The authentication server verifies the credentials provided by the supplicant and determines whether access should be granted. In enterprise environments, a RADIUS server commonly performs this role. It communicates with the authenticator to process authentication requests and return an authorization decision.
Together, these three components create the foundation of 802.1X authentication. The supplicant requests network access, the authenticator forwards the authentication request, and the authentication server validates the identity before the network grants access.
This video goes into greater detail about how 802.1X authentication works.
How Is 802.1X Used?
The IEEE 802.1X standard provides an authentication framework for wireless local area networks (WLANs) and can also be used to control access to wired networks. It uses EAP to exchange authentication messages between the client, authenticator, and authentication server.
The authentication server is commonly a RADIUS server that supports EAP. It can authenticate the client device or user using credentials such as passwords or digital certificates. The authentication server maintains the information required for authentication and communicates the authentication result to the authenticator, which then permits or denies network access to the supplicant.
This authentication framework gives organizations more than a way to verify identities. It can also help control, monitor, and manage network access before, during, and after a device connects. These capabilities allow organizations to manage network access at different stages of the connection process, including:
- Control access: Block network access until a user or device is authenticated
- Identify users and devices: Verify users through credentials and devices through identities such as machine IDs
- Authenticate and authorize: Determine who can connect and what network access they should receive
- Onboard devices: Provision authorized devices with the credentials and configurations needed to connect
- Profile endpoints: Collect information such as MAC addresses and connection points to identify devices
- Enforce policies: Apply role- and permission-based network access policies
- Control active sessions: Terminate or restrict access when a user or device should no longer be connected
How Does 802.1X Authentication Work?
802.1X authentication uses EAP to authenticate a user or device before granting network access. The process involves communication between the supplicant, authenticator, and authentication server.
The authentication process typically follows these steps:
- Supplicant requests network access: The client device, or supplicant, connects to a network switch or wireless access point and requests access.
- Authenticator requests the client’s identity: The switch or access point acts as the authenticator and sends an EAP request to the supplicant.
- The supplicant provides its identity: The client responds with its identity and the required authentication information using the selected EAP method.
- Authenticator forwards the request: The authenticator forwards the authentication information to the RADIUS authentication server for verification.
- RADIUS server validates the credentials: The RADIUS server evaluates the authentication request according to the configured authentication method and policies. It can accept, reject, or challenge the authentication request.
- The authentication result is returned: The RADIUS server sends the authentication result back to the authenticator. If authentication is successful, the authenticator allows the supplicant to access the network.
- Network access is granted: Once authentication succeeds, the device can access the network and its authorized resources. If authentication fails, network access remains restricted.
Different Types of 802.1X Authentication
The 802.1X framework supports several EAP authentication methods, including EAP-TLS, PEAP, and EAP-TTLS. These methods allow the network to authenticate the client while also providing mechanisms for the client to authenticate the network.
- EAP-TLS (EAP-Transport Layer Security): Uses digital certificates for certificate-based authentication, providing strong authentication without relying on passwords.
- PEAP (Protected EAP): Uses a protected tunnel to secure password-based authentication. If the underlying password is low-entropy or predictable, such as a dictionary word, it may be vulnerable to password-based attacks.
- EAP-TTLS (EAP-Tunneled TLS): Uses a secure TLS tunnel to protect the authentication exchange and typically relies on password-based authentication. Like PEAP, its security can depend on the strength of the underlying password.
For a detailed comparison of these authentication methods, see our guide to WPA2-Enterprise Authentication Protocols.
Role of 802.1X in Network Security
When properly implemented, 802.1X is the most secure network authentication method presently accessible. The implementation of 802.1X network security when adding new devices to an existing network not only fortifies the network against potential cyber threats but also streamlines the process, saving valuable time, resources, and minimizing stress.
The graphic below illustrates the centrality of 802.1X as a network authentication method.
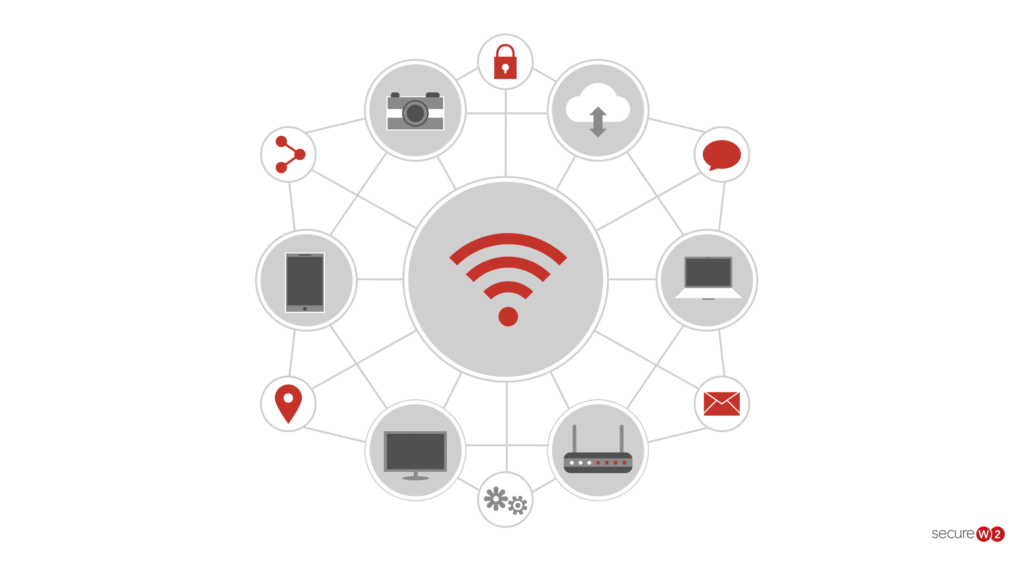
In order to establish connectivity with 802.1X-compliant equipment, no formal networking education is required. IT-friendly equipment possesses the capability to authenticate itself as a reliable hardware component on the network, thereby simplifying the setup process.
To establish network connectivity for your equipment, contact IT personnel and request the 802.1X network access protocol that has been deployed, along with the present security certificate and/or password.
802.1X security is greatly influenced by the following factors:
- The device setup procedure is quite complex, and if performed by a non-IT user, it may pose a security threat. The methodology is intricate and can only be comprehended by an individual with significant proficiency in information technology.
- The choice between certificate-based or credential-based authentication. The most secure implementation of 802.1X, certificate-based Extensible Authentication Protocol–Transport Layer Security (EAP-TLS), dramatically decreases the danger of credential theft for an enterprise.
Prerequisites for Windows RADIUS Server 2019
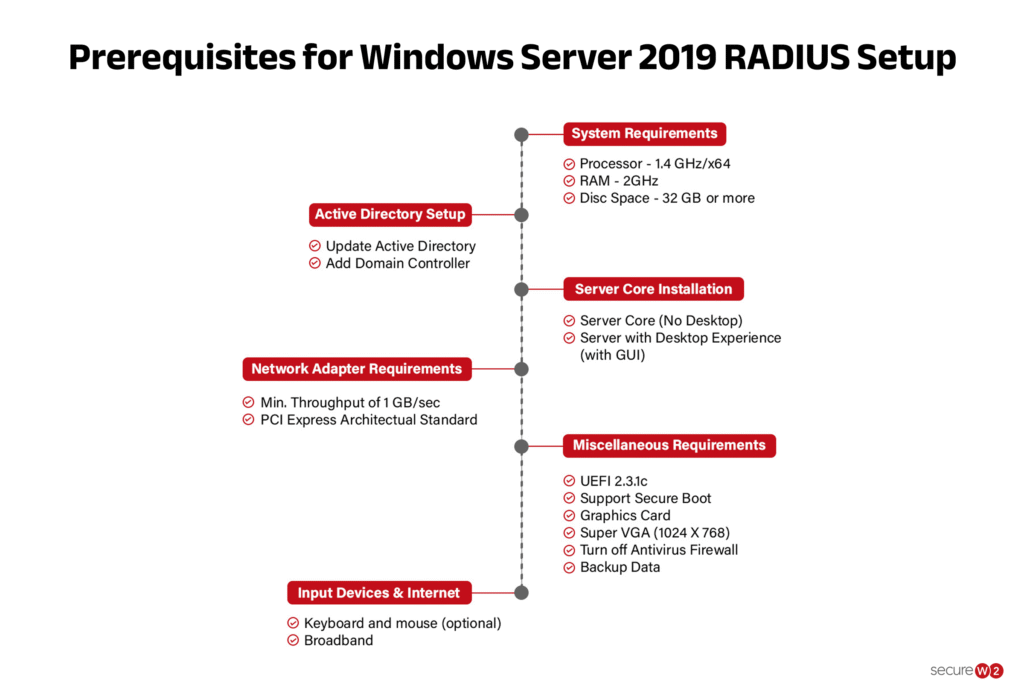
Before beginning the 802.1X setup on Windows Server 2019 as a RADIUS server, make sure your environment meets the required system, network, Active Directory, and installation requirements.
The key prerequisites are summarized in the graphic below.
Steps to Configure RADIUS for Windows Server 2019
Windows Server 2019 is the operating system that bridges on-premises and cloud environments.
Let’s dive deeper into each step involved in configuring Windows Server 2019:
Step 1: Install and Set Up Windows Server 2019
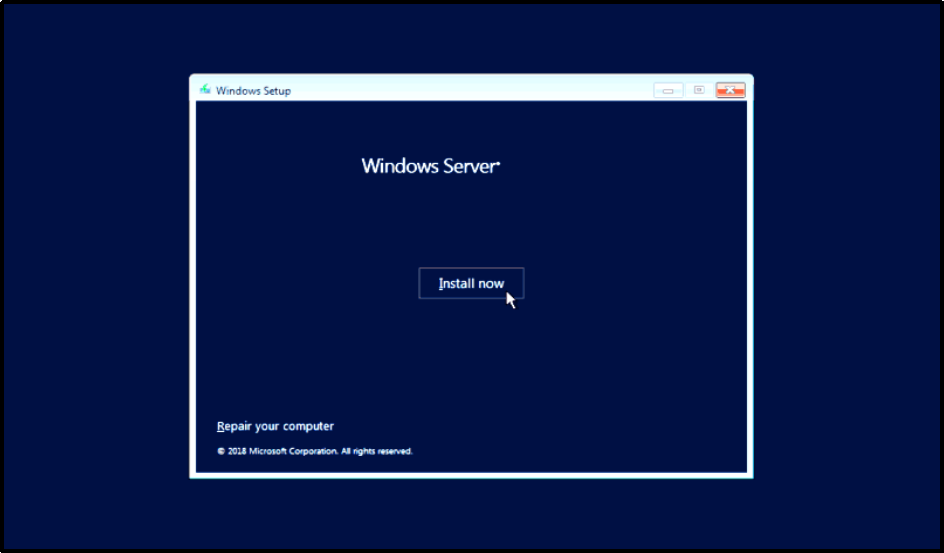
- Download Windows Server 2019 from Microsoft’s website. The setup screen will look like the screenshot below.
- Accept license requirements and click Next.
- Select a language, time, currency, keyboard, and input method in Windows Setup. Click Next when finished.
- Click Install Now.
- Choose the Windows Server 2019 edition to install.
- The server should reboot after the first configuration.
- The built-in Administrator account password will be requested. Click Finish.
- The built-in Administrator account password is requested and updated. Continue with Finish.
- Access Windows Server 2019 desktop after a few seconds.
- Click Yes in the Network window on the right of the server desktop to allow network connection.
Success: Installation of Windows Server 2019 is complete.
Step 2: Install and Configure Active Directory Domain Services(AD-DS)
- Open Windows Server 2019.
- Click Start.
- Click Server Manager.
- Navigate to Role Summary.
- Click Add Roles and Features.
- Select Role-based or Feature-based Installation.
- Navigate to the Before You Begin page and click
- Go to Select Server Roles.
- Select Active Directory Domain Services.
- Navigate to the Select Server Roles page.
- Select the Active Directory Domain Services.
- Click Next.
- Click Install on Confirm Installation Selections.
- Navigate to the Installation Results page and click Close.
Success: Installation of AD-DS is complete.
Step 3: Install AD-CS, NPS, and IIS
For configuring AD-CS, Click Here; for NPS, Click Here; and for IIS, Click Here.
Please Note: A certificate-based network requires a variety of components to operate. The user must build trusted servers and certificate authorities (CA) to ensure that devices may enroll for certificates, authenticate users, manage the certificate life cycle, and segment users for various group rules.
Also, the installation of AD-CS must share the domain with the already installed AD-DS.
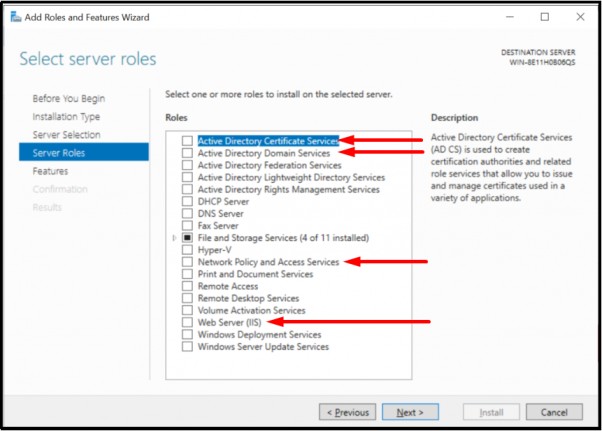
- Go to the Server Manager You can see the Select server roles panel in the screenshot below.
- Click Add Roles after choosing Roles.
- On the page called Before You Begin, click Next.
- Select NPS and AD-CS.
- Click Next.
- Click Next on NPS.
- Select NPS from the list of Role Services.
- Click Next.
- Select Create a self-signed SSL certificate. Then click Next.
- Click Next on the AD-CS
- On the Select Role Services page, choose Certification Authority and click Next.
- On the Specify Setup page, choose Enterprise and click Next.
- On the Specify CA Type page, choose Root CA and click Next.
- On the Set Up Private Key page, click Create a new private key and click Next.
- Click Next on Configure Cryptography for CA.
- Enter details on the Configure CA Name page and click Next.
- On the Set Validity Period page, enter the time frame and click Next.
- On the page to configure the certificate database, click Next.
- On the Web Server (IIS) page, click Next.
- On the Select Role Services page, click Next.
- On the Confirm Installation Choice page, click Install.
- Close the window.
Success: Installations of AD-CS, Web Server (IIS), and NPS are now complete.
Step 4: Configure NPS for RADIUS Authentication
Client computers and devices — such as laptops, tablets, phones, and other machines running client operating systems — are not considered to be RADIUS clients.
RADIUS clients are network access servers like wireless access points, switches that can handle 802.1X, virtual private network (VPN) servers, and dial-up servers. They use the RADIUS protocol to connect to Network Policy Server (NPS) servers.
- Click Start and choose Administrative Tools.
- On the Network Policy Server, click the NPS
- Click OK after choosing Register Server in Active Directory.
- Select OK.
- On the NPS (Local) page, choose RADIUS server for 1X wireless or wired connections.
- Tap 1X.
- On the page for setting up 802.1X, choose Secure wireless connections.
- Enter username. Then press the Next
- On the Configure 802.1X page, add RADIUS clients and click Next.
- On the New RADIUS Client page, type the following.
- Name
- IP Address
- Shared Secret (Manual)
- Click OK. Then click Next.
- On the Configure 802.1X page, select Microsoft Protected EAP (PEAP).
- Tap Configure.
- On the Edit Protected EAP Properties page, choose Secured password and click Edit.
- Enter the number of authentication retries. Then click OK and Next.
- Tap Groups and click Next.
- Click Next once more. Then click Finish.
- Restart NPS.
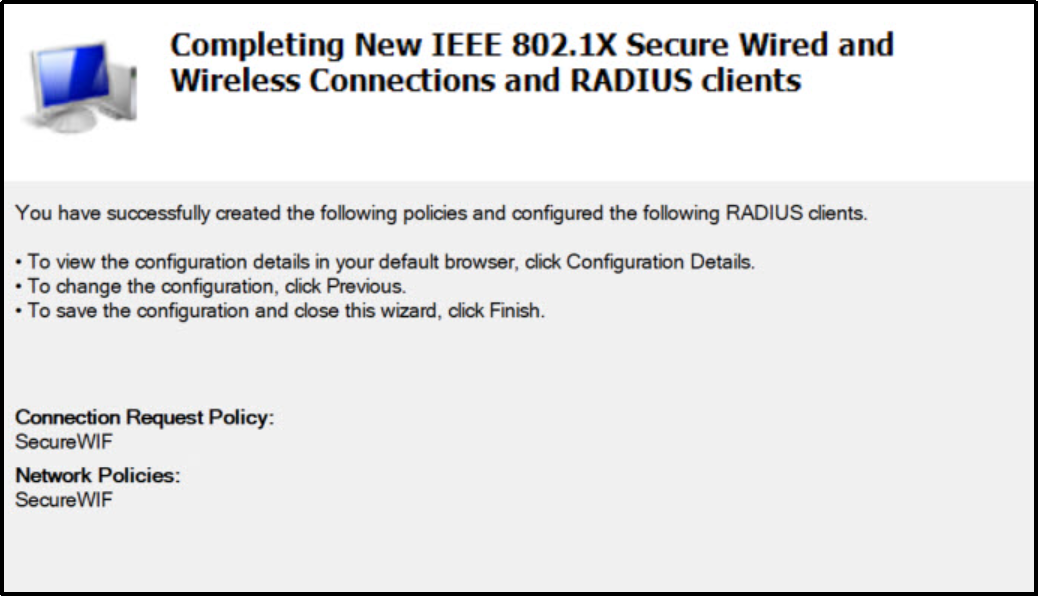
The screenshot below shows you what the final completion screen should look like.
Step 5: Define Network Policies for Users/Devices
Using the Network Policy Wizard, you can add new conditions, restrictions, and settings to the network policies.
- Go to the NPS console and press the NPS button (local).
- Click Policies and open them up.
- Select Network Policies.
- Choose New.
- Type the name of a policy.
- Choose “Unspecified“ for the Type of Network Access Server when using Netscaler, or “RCdevs OpenLDAP” when using OTP.
- Click Add under Specify Conditions.
- Click Add after selecting Windows Groups.
- Click Add Groups and then click OK.
- Choose NAS Identifier from the list of conditions.
- Enter a name, and then click Next to move on.
- Choose Access Granted in the Specify Access Permission
- For the most security, choose MS-CHAP v2 under Configure Authentication Method.
- Click Next.
- In Configure Settings, choose Standard for RADIUS
- Click Add.
- Enter the attribute’s value in String, then click OK.
- Click Next, then click Finish.
Using our Cloud RADIUS, administrators may establish and apply a wide variety of rules, including lookup policies implemented at the time of authentication. The following image illustrates how the SecureW2 authentication works.
![Illustration of the SecureW2 certificate-based authentication process. The user and device present a certificate to Cloud RADIUS requesting access to the Wi-Fi, Wired, or VPN network. Cloud RADIUS checks against Azure AD and returns a network policy and access accept.]](https://cloudradius.com/wp-content/uploads/2023/03/SecureW2-Certificate-Based-Authentication-Process-1024x561.png)
The phrase ‘selective access’ aptly elucidates one of many “must-haves” for the RADIUS-on-the-cloud.
An admin may determine whether to allow or deny persons and devices based on the time of day, or limit access to devices running a specific operating system.
Step 6: Implement 802.1X Authentication for Zero Clients
Refer to the steps below to implement 802.1X Authentication for Zero Clients: Open the Network and Sharing Center by hovering over the Control Panel and clicking on it.
- Click Change Adapter Settings.
- Tap Properties and then click on Local Area Connection.
- Choose Authentication and click Enable IEEE 802.1X
- Choose the protocol from the dropdown menu, as shown in the screenshot below.
![Screenshot of the Windows Ethernet Properties Authentication tab. The Enable IEEE 802.1X authentication box is checked, and the network authentication method is set to Microsoft: Protected EAP (PEAP). The Additional Settings button is highlighted in red.]](https://cloudradius.com/wp-content/uploads/2023/03/Picture7.png)
Step 7: Configure Wireless Connection Request
Open the Network and Sharing Center by hovering over the Control Panel and clicking on it.
- Click on Manage Wireless Networks.
- Choose Manually Create a network profile.
- In Network Name, type in the SSID and click Next. Click on Change Connection Settings.
- Click on Settings and then on Security. Click OK after choosing the Trusted Root CA.
- Go to Settings > Advanced.
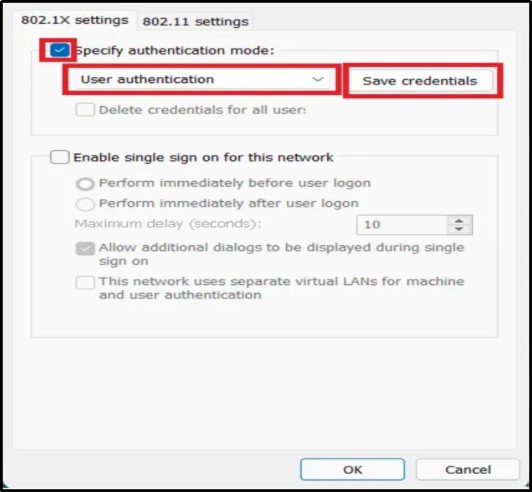
- Click OK after choosing Specify Authentication Mode, as shown in the screenshot below.
Non-Cloud Compliance of Windows RADIUS Servers
Neither the Network Policy Server (NPS) nor Active Directory (AD) was conceived with cloud-based network authentication in mind.
Using what has historically been an on-premises RADIUS solution to manage cloud-based resources would need a large investment in both IT man-hours and network infrastructure. We have found this to be a major challenge for businesses looking to migrate Active Directory to Azure while maintaining 802.1X compatibility. Setting up and overseeing such initiatives is difficult; they also take up a lot of time and money.
In order to host NPS in the cloud, you need to combine Windows NPS as a RADIUS proxy with a cloud-based RADIUS solution.
A user sends their authentication request to the cloud RADIUS, and in turn, it is forwarded to NPS for final authentication. This process requires a specific configuration of RADIUS policies to match NPS.
Warning: Due to its physical accessibility, the NPS server on-premises is susceptible to various physical security concerns, including attackers, natural catastrophes, and even power outages.
Furthermore, the expenses of securing physical locations’ on-premises RADIUS are seldom less expensive than Cloud RADIUS.
Replace Legacy 802.1X Infrastructure With Certificate-Based Network Access
802.1X is only as strong as the infrastructure behind it. Password-based methods such as PEAP-MSCHAPv2 introduce credential risk that no firewall can fully neutralize whereas certificates remove that risk entirely.
Our JoinNow platform delivers cloud-native 802.1X enforcement built around EAP-TLS, with streamlined certificate enrollment for both managed and unmanaged devices, eliminating the need for on-premises RADIUS hardware while simplifying secure network access at scale.
Organizations that move to SecureW2 solutions minimize credential-based support tickets, and close attack surfaces left wide open by legacy network access control systems.
See how SecureW2 simplifies certificate-based 802.1X for your environment: Schedule a demo.
Frequently Asked Questions
What is 802.1X authentication?
802.1X authentication is a network access control standard that verifies users or devices before granting access to a wired or wireless network. It typically uses EAP for authentication and RADIUS to communicate with the authentication server.
What are the main parts of 802.1X authentication?
The three main components are the supplicant, authenticator, and authentication server. The supplicant is the client device, the authenticator is typically a switch or access point, and the authentication server is commonly a RADIUS server.
Does 802.1X require authentication?
Yes. Authentication is the core function of 802.1X. A device or user must successfully authenticate before the network grants the access controlled by 802.1X.
How to fix 802.1X authentication?
Start by checking the 802.1X client configuration, EAP method, RADIUS server settings, and network connectivity. For certificate-based authentication, verify that the client and RADIUS server certificates are valid, trusted, and not expired. On Windows, NPS and client authentication logs can also help identify the cause of failed authentication.
Should I enable 802.1X authentication?
Yes, 802.1X authentication is recommended for enterprise wired and wireless networks because it verifies users or devices before granting network access and provides centralized access control through EAP and RADIUS.