Key Takeaways
- Meraki supports 802.1X EAP-TLS authentication, enabling certificate-based, passwordless access control through a RADIUS server.
- The SecureW2 JoinNow Platform simplifies EAP-TLS deployment for Meraki networks, using Cloud RADIUS for authentication paired with Dynamic PKI for certificate issuance and JoinNow MultiOS for device onboarding.
- Testing the configuration requires a certificate-enrolled client, with successful authentication verified through SecureW2 Cloud RADIUS events and the Meraki Dashboard.
Passwords are one of the weakest points in network security. They can be stolen, shared, or reused, leaving organizations exposed to threats such as Adversary-in-the-Middle (AiTM) attacks and credential theft.
Extensible Authentication Protocol-Transport Layer Security (EAP-TLS) provides a stronger alternative by replacing passwords with digital certificates for secure, phishing-resistant authentication.
In this guide, we’ll show you how to configure 802.1X EAP-TLS authentication with Meraki Access Points using SecureW2 PKI solutions. We’ll start with the key configuration steps, then walk through each step in detail to help you secure your network with certificate-based authentication.
How to Configure 802.1X EAP-TLS with Meraki
Configuring SecureW2 PKI Services
Configuring and managing a PKI is difficult. This is why we designed our PKI services to be completely turnkey.
Everything that’s required for EAP-TLS (certificate authorities, CRL, management software, etc) is created using our simple Getting Started Wizard.
Identity Provider Integration
SecureW2 integrates with every major LDAP (Lightweight Directory Access Protocol) and SAML (Security Assertion Markup Language) IdP to authenticate users and enroll them for certificates.
SecureW2 integrates with:
- Active Directory/LDAP
- Google Workspace
- Active Directory Federation Services
- Okta
Getting Users Enrolled for Certificates
Set up an onboarding SSID for Bring Your Own Device (BYOD) self-service certificate enrollment.
- Users can easily enroll themselves for 802.1X and certificates and get their devices configured for secure network access using JoinNow MultiOS for onboarding.
- They can use it to set up their devices from the comfort of their own home, or configure an open SSID to redirect users to the JoinNow Onboarding Solution to ensure the enrollment process proceeds smoothly.
Using Gateway APIs to Auto-Enroll Managed Devices for Certificates
- Rather than manually enrolling every managed device for a certificate, use our Managed Device Gateway APIs to automatically enroll all your managed devices, through any major Mobile Device Management (MDM) software, for machine and/or user certificates.
Configuring the RADIUS Server
Integrate SecureW2 PKI services with a RADIUS server.
- Our PKI services integrate cleanly with all major RADIUS servers. We can work with your existing infrastructure to make implementation simple and efficient. No RADIUS infrastructure? No problem: SecureW2 comes built-in with our Cloud RADIUS.
Watch this video to learn more about our Cloud RADIUS solution.
Integrating a Meraki AP with a RADIUS server
- Once you’ve figured out your RADIUS setup, the SecureW2 JoinNow Platform can configure your RADIUS server to integrate seamlessly with Meraki Access Points (APs). Below is a step-by-step guide.
Prerequisites for Configuring 802.1X EAP-TLS with Meraki
Before configuring 802.1X EAP-TLS with Meraki, ensure you have met the following requirements, as described in the table:
| Requirement | What you need |
|---|---|
| Meraki Access Points | A Meraki wireless network with administrator access to the Meraki Dashboard. |
| SecureW2 Cloud RADIUS | A Cloud RADIUS account configured to authenticate EAP-TLS requests from your Meraki APs. |
| PKI and Certificates | A SecureW2 PKI environment for issuing and managing client certificates. |
| Identity Provider | An identity provider such as Microsoft Entra ID, Google Workspace, Okta, or Active Directory for user authentication and certificate enrollment, if required. |
| Certificate Enrollment | A method for provisioning certificates to users and devices, such as SecureW2 JoinNow or an MDM integration. |
| RADIUS Details | The RADIUS server IP address, authentication port, and shared secret required to connect Meraki to Cloud RADIUS. |
| Administrative Access | Administrator access to the Meraki Dashboard and SecureW2 management portal. |
| Onboarding SSID | An optional onboarding SSID if users need to self-enroll their devices for certificates. |
Configuring an Open SSID for Self-Service Certificate Enrollment
Setting up EAP-TLS authentication on your 802.1X network is easier if you create an onboarding SSID, especially for new devices that have previously never connected to a network.
When users enroll for a certificate on the Onboarding SSID, they are redirected to the SecureW2 landing page.
In lieu of using an Onboarding SSID, users can use mobile data to enroll for a certificate when using applicable devices. From here, the OS is detected and a client is deployed that is specific to the OS.
The client then configures the device by installing the Wi-Fi certificate and appropriate network settings required to authenticate via EAP-TLS. Lastly, their device is migrated to the secure SSID.
Success: In the past, the process of loading certificates into users’ devices was incredibly difficult, but the SecureW2 onboarding process requires just a few steps.
SecureW2 takes the burden off the IT department to onboard every network user, but still allows them to monitor the Wi-Fi onboarding process.
Once certificate authentication is complete, users can automatically connect to the network without the hassle of password-related disconnects caused by password change policies.
Configuring Your Onboarding SSIDs
- Log in to the Meraki Dashboard.
- After selecting your Organization and your Network, select Wireless to configure your SSIDs.
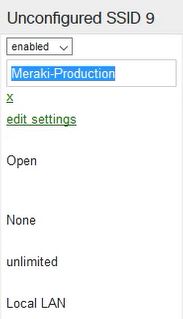
- To create a new SSID, select an unconfigured SSID and switch it from disabled to enabled, as shown in the screenshot below:

- To create a new SSID, select an unconfigured SSID and switch it from disabled to enabled, as shown in the screenshot below:
- Rename the SSID to configure it, and click Save Changes.
Configure the Access Point to Use a Splash Page
- Select Wireless again, and choose Access Control.
- Set the Network Access to Open (no encryption).
- Under the Splash Page section, select Click-through, as shown in the screenshot below.
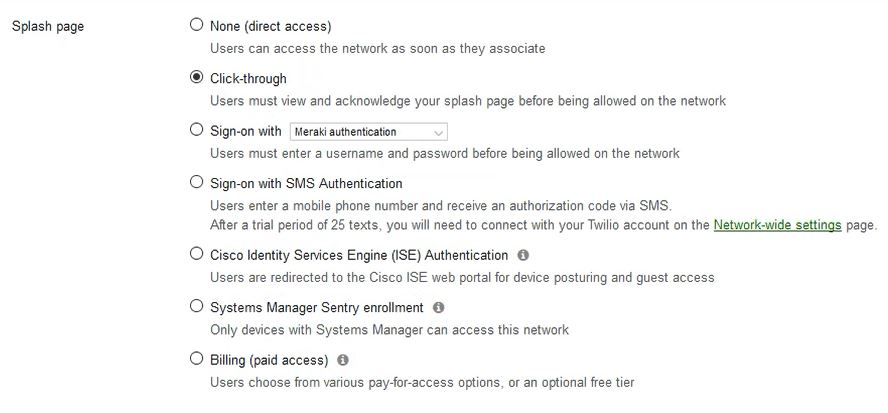
This process will set the redirect to go to the SecureW2 landing page.
Configure BYOD With Appropriate Data Safeguards
When implementing a Bring Your Own Device (BYOD) system, it’s vital to keep corporate data and personal data separate and protected. This division keeps corporate data stored in a secure application, separate from personal data. This creates insurance for the corporation that their sensitive data will not be breached.
For an Onboarding SSID, you need to allow onboarding related resources. For example, the MultiOS solution uses an Android application to configure Android devices for WPA2-Enterprise, so you need to allow access to the Play Store on our Onboarding SSID.
Another example is the Apple CNA, which can get in the way of WPA2-Enterprise configuration. The CNA is prompted when an Apple device can’t contact certain Apple servers, so you need to allow contact in order to prevent the CNA from popping up.
Info: You control what resources can be accessed on the onboarding SSID by keeping data separate. It allows network administrators to control access to certain sites and applications, steering network users away from potentially harmful situations.
To configure this approach:
- Select Wireless again.
- Go to the Firewall & traffic shaping settings, and make sure your SSID is selected.
- Under the Layer 3 firewall rules section, you will need to:
- Input the rules that allow the firewall through to SecureW2 resources (See Chapter 2: Firewall Rules in the JoinNow MultiOS Deployment Guide in the management portal).
- Add a deny rule for 0.0.0.0/0, so that no one can abuse this open SSID just to reach the internet.
- Save Changes.
Set Up the Redirect to the SecureW2 Landing Page
The last thing you’ll need to configure is the redirect.
Under Wireless:
- Click Splash Page.
- Double check that the SSID is the same as the one you configured earlier.
- In the Custom Splash URL section, input the Onboarding Landing Page URL from SecureW2, and click Save Changes.
Success: Now your Onboarding SSID is configured!
In the next section, we’ll look at how to integrate SecureW2 Cloud RADIUS with Meraki APs.
Integrating SecureW2 Cloud RADIUS with Meraki Access Points
Now that we’ve configured the onboarding SSID that will enroll users for a certificate, we need to set up the secure SSID.
This SSID needs to be configured for EAP-TLS WPA2-Enterprise authentication. It also needs be integrated with a RADIUS server, in this case the SecureW2 Cloud RADIUS server, that will authenticate the users’ certificate and authorize them for network access.
Configuring Your Secure SSIDs
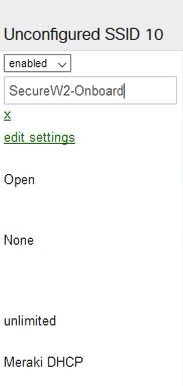
- Create another SSID by selecting an un-configured SSID and then enabling it, as shown in the screenshot below.

- Rename the SSID (make sure it is the same name as the SSID in the Network Profile).
- In your Network Profile, when you click Edit, you should see the SSID section, and the name you entered should match.
- Scroll down and click Save Changes.
Setting Up the RADIUS Information
Now, you need to enter the RADIUS information:
- Under Wireless, select Access control.
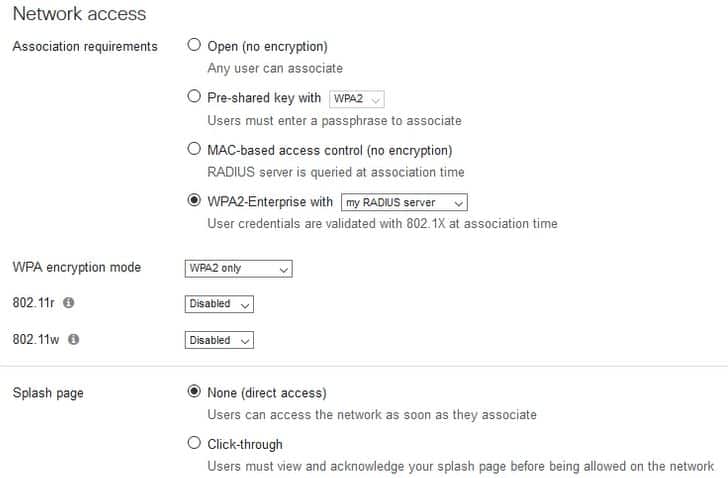
- Under Network access, change the default value from Open (no encryption) to WPA2 Enterprise with my RADIUS server.
- For WPA encryption mode, select WPA2 only.
- In the Splash page section, leave it set to None (direct access), as shown in the screenshot below.
You can find the details about your RADIUS when you go to AAA Management and AAA Configuration.
Here you will see a Primary IP Address, Secondary IP Address, Port Number and a Shared Secret, as you can see in the screenshot below.
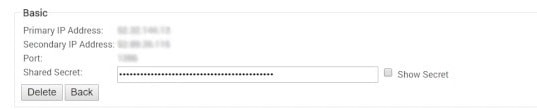
- Under RADIUS Servers, click the green link to Add a server, as shown in the screenshot below.

- Enter the Primary IP Address, Port Number, and Shared Secret respectively.
- You will need to perform the same steps for the Secondary IP Address by entering the Secondary IP Address, Port Number, and Shared Secret.
- Scroll down and click Save changes.

Success: And that’s it; you’re on your way to a more secure wireless network!
How to Test and Validate Your 802.1X Meraki Configuration
Once EAP-TLS is configured, test the connection using a device with a valid client certificate.
1. Connect to the Secure SSID: Connect the test device to the Meraki SSID configured for WPA2-Enterprise. A correctly configured device should authenticate using its client certificate without prompting for a username or password.
2. Verify the RADIUS Authentication: Open RADIUS Events in the SecureW2 management portal and locate the test device’s authentication request.
A successful connection should show:
- The expected user and device
- The client certificate details
- An ACCESS_ACCEPT response
3. Verify the Connection in Meraki: In the Meraki Dashboard, open Network-wide → Monitor → Event log and search for the test device. Confirm that the device successfully authenticated through 802.1X.
4. Confirm Network Access: After authentication, verify that the device:
- Receives an IP address
- Can access the internet and required network resources
- Receives the correct VLAN or network policy, if configured
5. Test a Failed Authentication: Test the configuration with a device that does not have a valid client certificate. The authentication should fail and appear as an ACCESS_REJECT or failed authentication event in the RADIUS or Meraki logs.
Note: Meraki’s Dashboard RADIUS Test tool verifies RADIUS connectivity and basic authentication, but it does not validate EAP-TLS because the test does not use a client certificate.
For EAP-TLS, perform the final validation using an actual certificate-enrolled client device.
Replace Legacy 802.1X Infrastructure With Certificate-Based Network Access
802.1X is only as strong as the infrastructure behind it. Password-based methods such as PEAP-MSCHAPv2 introduce credential risk that no firewall can fully neutralize whereas certificates remove vulnerable shared secrets altogether.
Our JoinNow platform delivers cloud-native 802.1X enforcement built around EAP-TLS, with streamlined certificate enrollment for both managed and unmanaged devices, eliminating the need for on-premises RADIUS hardware while simplifying secure network access at scale.
Organizations that move to SecureW2 solutions minimize credential-based support tickets, and close attack surfaces left wide open by legacy network access control systems.
See how SecureW2 simplifies certificate-based 802.1X for your environment: Schedule a demo.
Frequently Asked Questions
Does Meraki support RADIUS?
Yes. Meraki supports RADIUS authentication for WPA2-Enterprise networks, including EAP-TLS. Meraki Access Points can send RADIUS authentication requests to a configured RADIUS server and support attributes such as User-Name, NAS-IP-Address, NAS-Port, and Called-Station-Id. Meraki supports several EAP methods, including PEAP-MSCHAPv2 and certificate-based EAP-TLS authentication.
How do you configure RADIUS authentication with Meraki APs?
Configure RADIUS authentication from the Meraki Dashboard under Wireless > Access Control. Set Network Access to WPA2 Enterprise with my RADIUS server, select WPA2 as the encryption mode, and leave the Splash Page set to None. Then add your primary and secondary RADIUS server IP addresses, ports, and shared secrets, and save the configuration.
What is the RADIUS timeout for Meraki APs?
The RADIUS timeout determines how long a Meraki Access Point waits for a response from the RADIUS server before moving to the next configured server. Meraki allows you to configure a custom timeout in the Dashboard, which helps prevent unnecessary delays when a RADIUS server is unavailable.
What role does a RADIUS server play in Wi-Fi authentication?
A RADIUS server authenticates users or devices and determines whether they should receive network access. In an 802.1X deployment, the Meraki Access Point forwards authentication requests to the RADIUS server, which validates the credentials or client certificate and applies the appropriate access policies. RADIUS can also support network segmentation by assigning users or devices to specific VLANs.
What are the benefits of using Cloud RADIUS for wireless network authentication?
Cloud RADIUS provides centralized, scalable authentication without requiring an on-premises RADIUS server. It can support 802.1X and EAP-TLS authentication, integrate with identity providers and MDM platforms, and apply access policies based on users and devices. For Meraki environments, Cloud RADIUS can simplify deployment and reduce the infrastructure and maintenance required for traditional RADIUS servers.
What is RadSec, and how does it improve the security of Meraki wireless networks?
RadSec secures RADIUS communication by transporting RADIUS traffic over TCP through a TLS-encrypted connection. This protects RADIUS packets from interception and helps reduce the risk of Adversary-in-the-Middle attacks between the network infrastructure and RADIUS server. RadSec also uses certificates to authenticate the RADIUS server, helping prevent connections to an unintended or malicious server.
How can I enable 802.1X authentication?
Enable 802.1X globally on the network device, configure a RADIUS authentication method, and enable 802.1X on the required ports. On Cisco switches, this typically involves enabling AAA, configuring RADIUS as the authentication method, enabling dot1x system-auth-control, and setting the relevant interfaces to use 802.1X authentication.
How do I configure 802.1X on a Cisco switch?
Configure the Cisco switch as an 802.1X authenticator and connect it to a RADIUS server. Start by enabling AAA and 802.1X globally, configure the RADIUS authentication method, then configure each client-facing port for 802.1X with authentication port-control auto and dot1x pae authenticator.
Should 802.1X be enabled?
Yes, 802.1X should be enabled when you need identity-based network access control. It requires users or devices to authenticate before receiving network access, helping prevent unauthorized devices from connecting. It is particularly useful for enterprise wired and wireless networks where centralized authentication and access policies are required.