
How To Set Up Ubiquiti Unifi For RADIUS Authentication?
RADIUS (Remote Authentication Dial-In User Service) is a network protocol that enables centralized authentication, authorization, and accounting (AAA) for network access. On enterprise Wi-Fi, a UniFi RADIUS server allows users and devices to verify their identity before accessing the network, giving administrators greater control and visibility over network access.
Pairing RADIUS with the 802.1X authentication framework adds another layer of security. With certificate-based authentication such as EAP-TLS, devices can use digital certificates instead of passwords to authenticate to the network, helping reduce the risks associated with credential theft and other attacks.
This guide will explain:
- How to configure a UniFi RADIUS server for Wi-Fi authentication using 802.1X and a RADIUS server
- How to configure a RADIUS profile
- How to set up secure Wi-Fi settings
- How to configure certificate-based authentication
What Is a UniFi RADIUS Server?
A UniFi RADIUS server is a RADIUS service used with UniFi networking equipment to authenticate users and devices before granting access to a protected Wi-Fi network. It works with 802.1X authentication and can support certificate-based methods such as EAP-TLS for secure network access.
Like most enterprise-grade access points, Ubiquiti UniFi Access Points can work with a RADIUS server to support 802.1X authentication on WPA2-Enterprise networks. UniFi also supports VLAN configuration, allowing administrators to apply network segmentation based on authentication or access policies.
How Does RADIUS Wi-Fi Authentication Work?
RADIUS authentication involves the wireless client, access point (NAS), and RADIUS server working together. The diagram below illustrates how that authentication flow works.
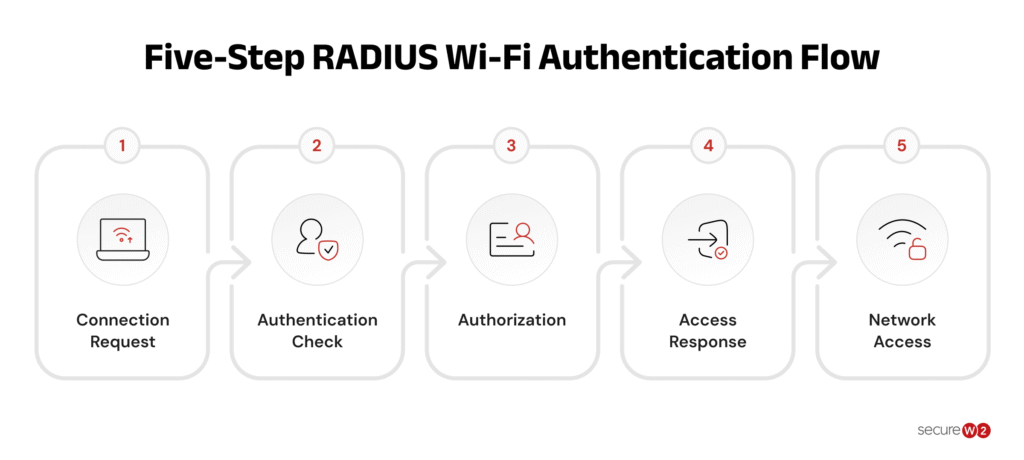
Understanding how the RADIUS components interact helps explain how RADIUS Wi-Fi authentication works in a UniFi environment.
- Connection request: When a user or device connects to the Wi-Fi network, the Network Access Server (NAS) sends an authentication request to the RADIUS server.
- Authentication check: The RADIUS server verifies the user’s credentials against its database or connected authentication source and checks the applicable policies.
- Authorization: Based on the authentication result, the RADIUS server determines whether the user or device is authorized to access the network and provides the required configuration information.
- Access response: The server returns an Access-Accept, Access-Challenge, or Access-Reject response to the access point.
- Network access: The access point grants network access when authentication and authorization succeed.
This video goes deeper into how RADIUS authentication works.
What Is the Ubiquiti UniFi Wi-Fi Solution?
Ubiquiti UniFi solutions help you manage your Wi-Fi network through routers, access points, switches, and base stations.
UniFi Wi-Fi offers the utmost compatibility, is scalable to large organizations, and offers varied customizations. It helps you view and manage the devices on your network in real-time and troubleshoot network issues.
What Are the Advantages of Setting Up 802.1X in a Ubiquiti UniFi System?
Setting up 802.1X with Ubiquiti UniFi provides several benefits:
- Controlled network access: Ensures only authorized users and devices can access the network.
- Centralized access control: Works with RADIUS to assign network access and privileges based on authentication policies.
- Greater administrative control: Gives administrators more control over who can access the network and what they can access.
- Scalable security:1X can scale with your organization’s growing network and security requirements.
- Adaptability: Supports modern authentication technologies to help protect networks against evolving security threats.
How to Configure UniFi for 802.1X RADIUS Server Authentication
The Ubiquiti UniFi RADIUS support allows a third-party RADIUS server to configure a network for digital certificates with the EAP-TLS protocol using the 802.1X network authentication protocol. Here is what you need to get started with RADIUS configuration.
Prerequisites to Set Up RADIUS Authentication on the UniFi Access Point
- Create a RADIUS profile on SecureW2’s Cloud RADIUS to enable EAP-TLS authentication on the Ubiquiti infrastructure.\
- Create an onboarding SSID to issue digital certificates to managed user devices connected to the network using our Managed Device Gateway APIs. This would also redirect BYODs to a self-enrollment portal.
- Create a new wireless network in the UniFi console and set it to WPA2 Enterprise. Upon completion, you can enjoy a secure and user-friendly Wi-Fi connectivity experience.
Configure UniFi AP for RADIUS Authentication
Cloud RADIUS supports certificate-based authentication only through the EAP-TLS protocol.
Here’s how:
- From the UniFi Network console, go to Settings>Wireless network, and click on Create New Wireless Network.
- For Name/SSID, enter a name.
- Select the Enable the wireless network check box.
- Select Open for security purposes.
- Select the Apply guest policies check box.
- Go to Settings> Guest control to configure the SSID to redirect the users to the SecureW2 onboarding page.
- Select the Apply guest policies box.
Configuring the SSID
After enabling EAP-TLS authentication, let us configure the SSID to redirect users securely to the SecureW2 onboarding page.
- Go to Settings> Guest Control
- Update the details.
Configuring MAC-based RADIUS Authentication
This section will take you through the steps to create and configure an identity provider for MAC authentication.
Info: MAC authentication, also known as MAC auth bypass, allows devices that don’t support certificate-based authentication (such as some IoT devices) to authenticate using their MAC addresses instead.
- Log in to the JoinNow MultiOS Management Portal.
- Go to Identity Management > Identity Providers.
- Click Add Identity Provider.
- Enter the name of the identity provider in the Name Field.
- For the Description field, enter the suitable description for the identity provider.
- From the Type drop-down list, select MAC Authentication.
- Click Save to refresh the page.
- Select the Conditions tab.
- Click Add Device.
- For the MAC Address field, type the device’s MAC Address you need to authenticate.
- Click Saveand Update.
Configuring UniFi Access Points to Communicate with Cloud RADIUS
- Log in to the UniFi Portal.
- On the left pane, select Profiles.
- Click Create New RADIUS Profile.
- In the New RADIUS Profile page, for the Name field, enter the name of your RADIUS profile.
- Under the RADIUS Assigned VLAN Support section, select the Enable checkbox for Wireless Networks.
- In the RADIUS Settings section, for Authentication Servers, enter the IP Address, Port and Shared Secret. From the JoinNow MultiOS Management Portal (navigate to RADIUS > RADIUS Configuration), copy the IP Address, Port, and Shared Secret and paste them into the IP Address, Port, and Shared Secret fields in UniFi.
- Enter the RADIUS details and click ADD.
- Click Apply Changes.
Set Up an Open SSID on UniFi
With Cloud RADIUS, we will set up an open onboarding SSID that helps users to redirect to BYOD self-enrollment portal. It helps to issue certificates automatically to the connected devices.
- Navigate to Settings > Wireless Networks > Create New Wireless Network.
- Enter the name of the SSID in the NAME/SSID section.
- Under Enabled, check the box to Enable this wireless network.
- Under Security, select the radio button for Open.
- Under Guest Policy, select “Apply guest policies (captive portal, guest authentication, access).”
- Click Save.
Warning: Ubiquiti does not support the URL’s sub-domains.
We recommend you set up a local webserver with a rewritten URL that helps users be directed to the SecureW2 landing page.
Add the Webserver URL to “Redirect Using the Hostname”
- Navigate to Settings > Guest Control > Guest Policies.
- Check the Box Enable Guest Portal.
- Under Authentication choose No Authentication.
- Check the Box Redirect using hostname.
- Click Save.
Add the Access Control Lists (ACLs)
An Access Control List (ACL) prevents a BYOD from accessing unauthorized resources before they are securely onboarded to a network. The ACL creates a list of resources users can navigate for secure authentication.
Info: You need to limit the SSID so that it can be used only for self-service certificate enrollment and device network access configuration.
For more information about SSID contact our expert support engineers.
- Navigate to Settings > Guest Control > Guest Policies.
- Check the Box Enable Guest Portal.
- Under Access Control → Pre-Authorization add the ACLs (hostname or IPV4).
- Click on Apply.
Create a Secure SSID
We will set up the SSID that users will use for network authentication daily. This SSID will use 802.1X with the RADIUS server we added to the RADIUS Profile.
If you are setting this up with Cloud RADIUS, this SSID will use EAP-TLS, a passwordless authentication method using digital X.509 certificates.
- From your UniFi Network console, go to Settings > Wireless Networks.
- Click Create New Wireless Network.
- For Name/SSID, enter the name of the SSID.
- For Enabled, check the box for Enable this wireless network.
- For Security, select the radio button for WPA Enterprise.
- For the RADIUS Profile, click the dropdown and select the RADIUS profile you created.
- Click Save.
Users who enroll for a certificate using your onboarding SSID are redirected to your SecureW2 landing page. They enter their login credentials, and a client is deployed on their device, installing the Wi-Fi certificate and appropriate network settings to authenticate via EAP-TLS.
Their device is then migrated to your secure SSID.
How to Test Your UniFi RADIUS Setup
After configuring Cloud RADIUS, the UniFi RADIUS profile, and the secure SSID, test the setup from a client device to verify that EAP-TLS authentication and network access are working correctly.
Windows
- Connect to the secure SSID from the Wi-Fi settings.
- Confirm that the device connects successfully without requiring a password when using the provisioned EAP-TLS configuration.
- Verify that the device receives an IP address and can access the resources permitted by the network policy.
macOS
- Connect to the secure SSID from the Wi-Fi menu.
- Confirm that the device authenticates successfully using the provisioned EAP-TLS configuration.
- Verify that the device receives an IP address and can access the permitted network resources.
iOS/iPadOS
- Go to Settings > Wi-Fi and select the secure SSID.
- Confirm that the device connects successfully using the provisioned EAP-TLS configuration.
- Verify that the device receives an IP address and can access the permitted network resources.
Android
- Open Settings > Wi-Fi and select the secure SSID.
- Connect using the provisioned EAP-TLS configuration.
- Confirm that the device receives an IP address and can access the permitted network resources.
Verify RADIUS Authentication in UniFi
After connecting a test device, check the UniFi Network System Log and the Cloud RADIUS logs to confirm that the authentication request was successfully processed. If RADIUS-assigned VLANs are configured, verify that the device was placed on the expected VLAN and received the corresponding network access.
Troubleshooting UniFi RADIUS Setup
If authentication fails, check these common configuration and connectivity issues.
Authentication Failures
- Shared secret mismatch: Make sure the shared secret configured in UniFi matches the one configured on the RADIUS server.
- Certificate issues: For EAP-TLS authentication, verify that the client certificate is valid, trusted, and has not expired.
- RADIUS client not authorized: Confirm that the UniFi access point’s IP address is configured as an authorized RADIUS client on the RADIUS server.
Connectivity Issues
- Firewall blocking RADIUS traffic: Ensure firewalls allow RADIUS traffic between the UniFi access point and RADIUS server. UDP 1812 is commonly used for authentication, while UDP 1813 is commonly used for accounting.
- RADIUS server unreachable: Verify that the RADIUS server IP address and network connectivity are correctly configured.
- Network or DNS issues: If a hostname is used for the RADIUS server, verify that it resolves correctly from the relevant network.
VLAN Assignment Issues
If authentication succeeds but the client is placed on the wrong VLAN, check the following:
- RADIUS VLAN assignment: Verify that RADIUS-assigned VLANs are enabled in the UniFi Wi-Fi configuration.
- VLAN ID: Confirm that the VLAN returned by the RADIUS server is configured and available on the UniFi network.
- RADIUS attributes: For dynamic VLAN assignment, verify that the RADIUS server returns the required attributes, including Tunnel-Type, Tunnel-Medium-Type, and Tunnel-Private-Group-ID.
Checking Logs
Review the UniFi Network System Log and Cloud RADIUS logs to identify authentication failures and configuration errors. Comparing logs from both sides can help determine whether the issue is related to UniFi configuration, network connectivity, or RADIUS authentication.
Move Beyond On-Premises RADIUS With a Cloud-Native Authentication Stack
On-premises RADIUS servers carry hefty maintenance costs and an increased risk of hardware failure.
Our Cloud RADIUS eliminates operational overhead while strengthening security.
It authenticates users and devices using live security signals from your identity provider, MDM, and EDR/XDR platforms, so access decisions reflect current device posture, not a stale snapshot from last week’s sync.
The result is authentication that scales with the organization, not against it. Teams that have replaced legacy RADIUS with SecureW2 Cloud RADIUS consistently report faster authentication times, fewer outages, and best-in-class uptime, and the option for 99.999% availability.
If your current RADIUS setup is creating friction for IT or leaving security gaps, there is a better path. See SecureW2 Cloud RADIUS in action.
Frequently Asked Questions
Does UniFi have a RADIUS server?
Yes. UniFi Gateways include a built-in UniFi RADIUS server for 802.1X authentication. You can configure it under Settings > Networks > RADIUS Servers or use an external RADIUS server.
How to set up a RADIUS server in UniFi?
To set up a UniFi RADIUS server, go to Settings > Networks > RADIUS Servers, enable the RADIUS profile, and configure the shared secret, ports, and users. Then configure your Wi-Fi network with WPA2-Enterprise or WPA3-Enterprise and select the RADIUS profile.
How do I connect UniFi to an external RADIUS server?
In UniFi Network, go to Settings > Networks > RADIUS Servers and add your external RADIUS server. Enter the server’s IP address, authentication port, accounting port if needed, and shared secret. Then configure your Wi-Fi network to use WPA2-Enterprise or WPA3-Enterprise and select the RADIUS profile.
How do I configure RADIUS authentication for a UniFi Wi-Fi network?
In UniFi Network, create or edit your Wi-Fi network and select WPA2-Enterprise or WPA3-Enterprise as the security protocol. Select your configured RADIUS profile, then save the settings and test authentication with a valid RADIUS account.
