
How To Auto Deploy RADIUS WiFi With Group Policy
Key Takeaways
- RADIUS Wi-Fi deployment with Group Policy lets administrators centrally configure and deploy wireless authentication settings to domain-joined Windows devices.
- GPO Wi-Fi profiles can automate the deployment of SSID, security, authentication, and certificate settings required for RADIUS-based access.
- RADIUS Wi-Fi deployment requires configuring the RADIUS server, certificates, wireless network profile, and Group Policy settings to support 802.1X authentication.
Imagine entering your office and instantly connecting to a secure Wi-Fi network without entering passwords or manually configuring security settings. Sounds like magic, right? That’s the benefit of using RADIUS and Group Policy together. RADIUS acts as the gatekeeper, authenticating users and devices before granting network access, while Group Policy allows administrators to centrally configure and manage settings across domain-joined Windows devices.
With Group Policy Object (GPO) Wi-Fi deployment, administrators can centrally push wireless settings to domain-joined devices, eliminating the need to configure each device individually. RADIUS then handles authentication and access control, helping ensure that only authorized users and devices connect to the network.
This guide covers:
- The requirements for deploying RADIUS-authenticated Wi-Fi, including network architecture, RADIUS server configuration, and certificates
- How to use GPOs to manage Wi-Fi settings
- How to transition from traditional GPO-based deployment to cloud-based management with Microsoft Intune
What Is GPO Wi‑Fi?
GPO Wi‑Fi is a wireless network profile that is configured and deployed through Group Policy to domain‑joined Windows devices.
Instead of asking users to manually join a network and enter credentials, administrators define the SSID, security type, authentication method, and certificate settings once in a Group Policy Object (GPO) and let Active Directory push those settings automatically to all targeted machines.
A GPO Wi‑Fi profile typically includes:
- The SSID (network name) users should connect to
- The security type (e.g., WPA2‑Personal/WPA2‑Enterprise)
- The EAP method for 802.1X (such as PEAP or EAP‑TLS)
- The Trusted Root Certification Authority used to validate the RADIUS server
This approach ensures consistent, secure Wi‑Fi configuration across the organization with minimal user interaction.
However, for enterprise environments that require strong access control, the GPO Wi‑Fi profile is only one part of the solution; the actual authentication is handled by RADIUS, which verifies users and devices before allowing network access.
Understanding RADIUS Authentication
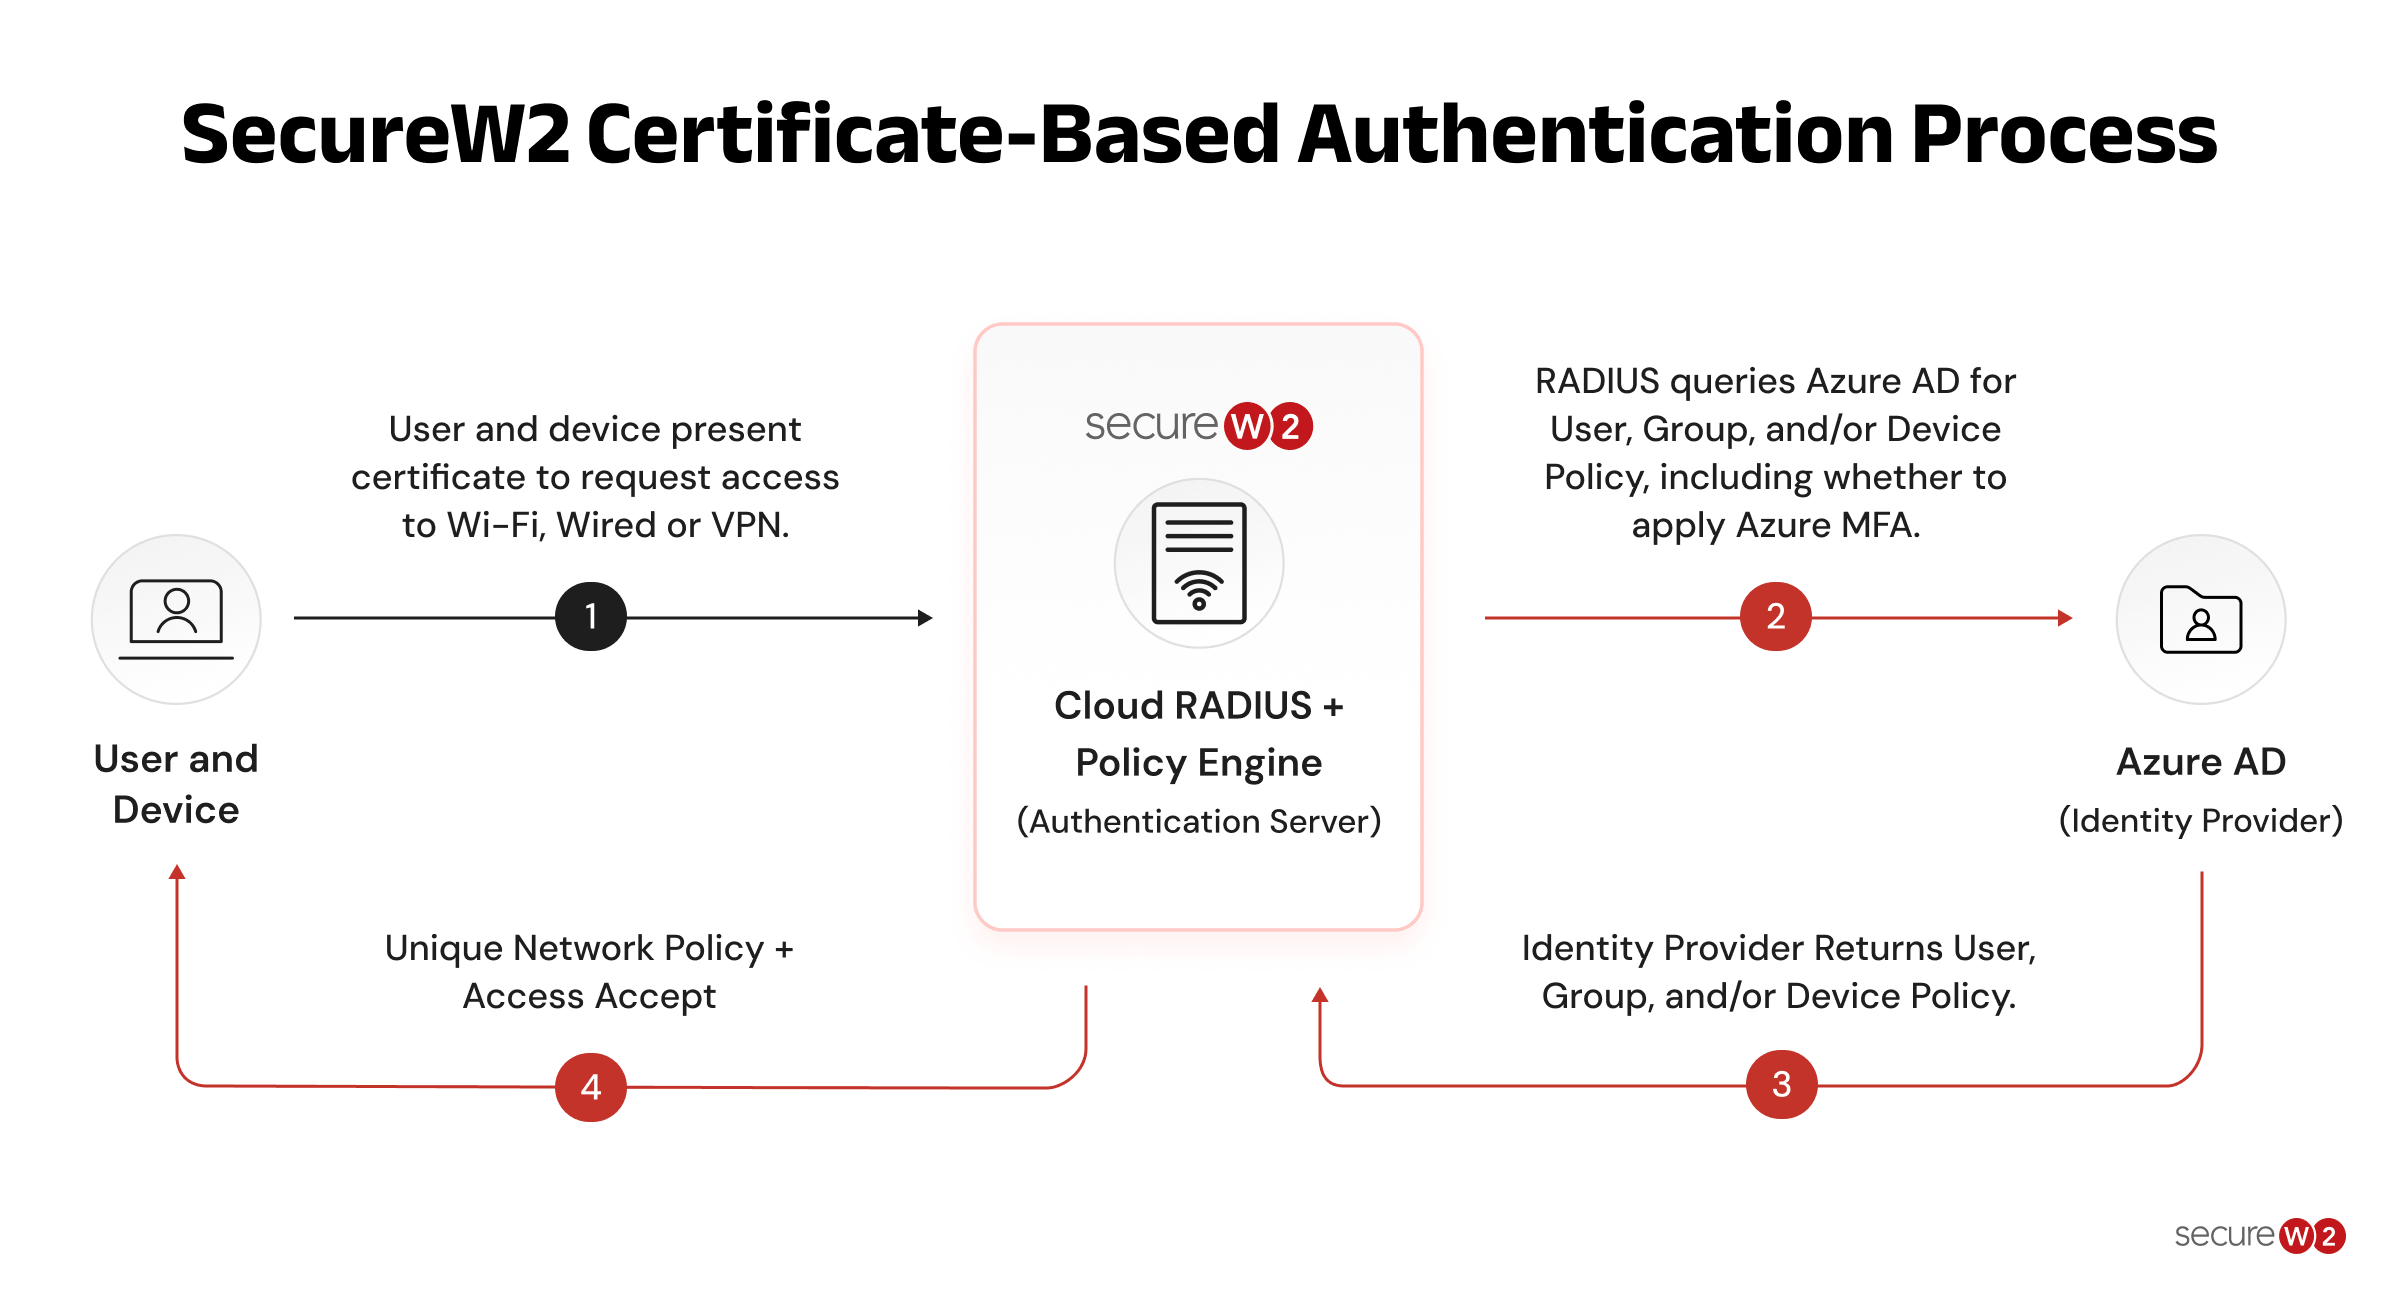
RADIUS (Remote Authentication Dial-In User Service) is a client-server protocol that provides centralized authentication, authorization, and accounting (AAA) for network access. It allows organizations to manage authentication policies from a central RADIUS server instead of configuring authentication independently on every network device.
For enterprise Wi-Fi, RADIUS is commonly used with 802.1X to control access to wireless networks. It can authenticate users or devices using credentials, digital certificates, or other supported authentication methods and apply access policies based on the authentication result.
A typical RADIUS deployment includes a RADIUS server, network access devices such as wireless access points, and an authentication source such as a user directory or identity provider.
This centralized architecture helps organizations manage network access consistently across multiple devices and locations.
RADIUS was originally developed by Livingston Enterprises in 1991 and was standardized by the IETF in RFC 2865. It remains widely supported across enterprise networking environments.
How Does RADIUS Authentication Work?
The RADIUS authentication process involves several components working together to verify user credentials and control network access.
- The Network Access Server (NAS) acts as a client of the RADIUS server, allowing remote network users to access the network.
- Whenever a remote user establishes a connection, the NAS requests authentication, authorization, and configuration data from the RADIUS server.
- The RADIUS server then confirms the user’s credentials and responds accordingly.
- RADIUS supports numerous access methods, including:
- Controlled network access switches that follow the 802.1X standard
- Dial-in servers
- VPN servers
- Wireless access points
- End users communicate indirectly with the RADIUS server through the NAS, helping provide secure network access.
This video goes into more depth about how RADIUS authentication works.
What Is Group Policy?
Microsoft’s Group Policy Object (GPO) is a collection of Group Policy settings that define a system’s appearance and behavior for a specific group of users.
You can use the Group Policy Management Console (GPMC), a Microsoft-provided software snap-in, to create and manage GPOs.
A GPO can be linked to Active Directory containers, including organizational units (OUs), domains, and sites. Using GPMC, you can create GPOs that define:
- Registry-based policies
- Security settings
- Program installation and maintenance settings
- Scripting settings
- Folder redirection settings
Types of GPOs
GPOs are divided into three types: local, non-local, and starter.
Local Group Policy Objects: A local GPO is a collection of group policy settings that only apply to the local machine and its users. Local GPOs are included by default on all Windows machines.
Non-local Group Policy Objects: A non-local GPO is used when policy settings must be applied to one or more Windows PCs or users. Non-local GPOs are applied to Windows PCs or users when joined to Active Directory objects such as sites, domains, or organizational units.
Starter Group Policy Objects: Introduced in Windows Server 2008, starter GPOs are Group Policy configuration templates. These objects allow an administrator to establish and save a pre-configured set of parameters that serve as a baseline for future defined policies.
Preparing for Group Policy RADIUS Authentication
Configuring a safe and efficient RADIUS Wi-Fi network involves numerous key stages. The preparatory steps are outlined here, with a focus on RADIUS with 802.1X and WPA2-Enterprise.
WPA2-Enterprise with 802.1X authentication is used to verify people or machines within a given domain.
The procedure includes the following components:
- Supplicant
- This wireless client authenticates against the RADIUS server using the Extensible Authentication Protocol (EAP) technique.
- Authenticator
- This access point sends authentication communications between the supplicant and the computer authentication server.
- RADIUS server
- This server performs user authentication and delivers Access-Accept signals to the access point to authorize network access.
Access Control and EAPOL Exchanges
Access points process Extensible Authentication Protocol Over LAN (EAPOL) exchanges between supplicants and transform them into RADIUS Access-Request messages. These communications are routed to the RADIUS server’s IP address and the specified UDP port.
To reduce latency, keep the round-trip between the access points and the RADIUS server short.
Supported RADIUS Attributes
When setting WPA2-Enterprise with 802.1X, the following RADIUS attribute details appear in Access-Request messages:
- Username
- NAS-IP-Address
- NAS-Port
- Called-Station-ID: Contains the access point’s BSSID and SSID.
- Calling-Station-ID: Contains the MAC address of the wireless device.
- Framed-MTU
- NAS-Port-Type
- Connect-Info
RADIUS Server Requirements
To support WPA2-Enterprise, the RADIUS server must:
- Obtain a certificate from a trustworthy Certificate Authority (CA)
- Configure each gateway access point as a RADIUS client with a shared secret
- Maintain a user database for authentication
RADIUS Configuration (Windows NPS + AD)
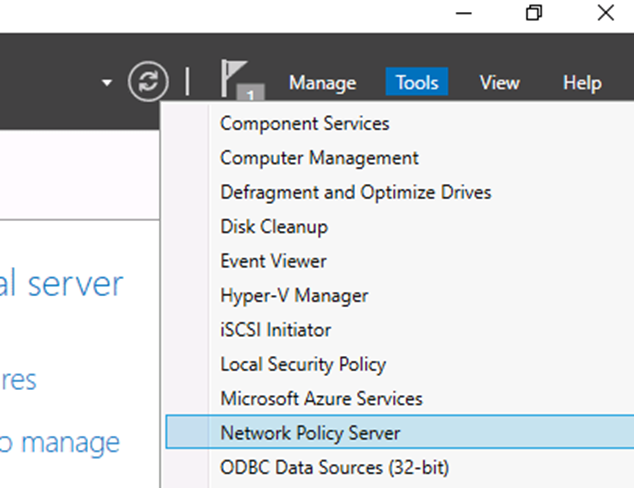
Setting up Windows Network Policy Server (NPS) entails:
- Adding the NPS role to Windows Server
- Install the Network Policy Server (NPS).
- Register the NPS server with Active Directory.
- Adding a trustworthy certificate to NPS
- Obtain a certificate from a trustworthy CA, set up a PKI, or create a self-signed certificate (not recommended for production).
- Adding access points as a RADIUS client to the NPS server:
- Gather the LAN IP addresses for all gateway access points.
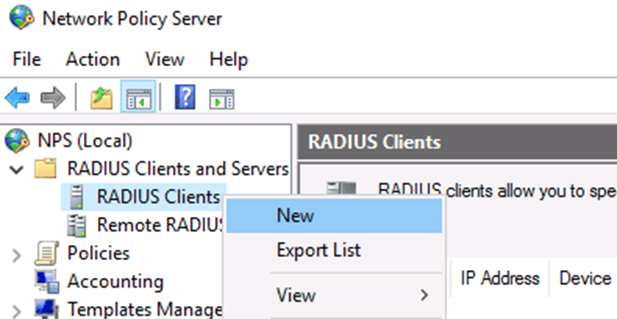
- Add each access point as a RADIUS client in NPS by entering its IP address, as the screenshot below illustrates.

- Setting up a policy in NPS to support PEAP-MSCHAPv2
- Create an NPS network policy.
- Configure the policy conditions and access permissions.
- Set the policy’s processing order.
- Under Constraints → Authentication Methods, select Microsoft: Protected EAP (PEAP) and click Edit.
- In Protected EAP Properties, select Secured password (EAP-MSCHAP v2) as the inner authentication method.
The screenshot below is what the NPS console looks like when RADIUS Clients is selected.
Auto-Deploying RADIUS Wi-Fi With Group Policy
- Access your Domain Controller by logging in.
- Open Group Policy Management.
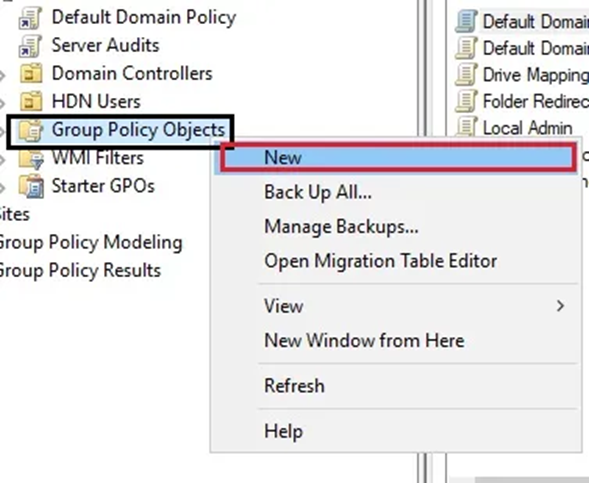
- Find Group Policy Objects, then choose New with a right-click, as shown in the screenshot below.

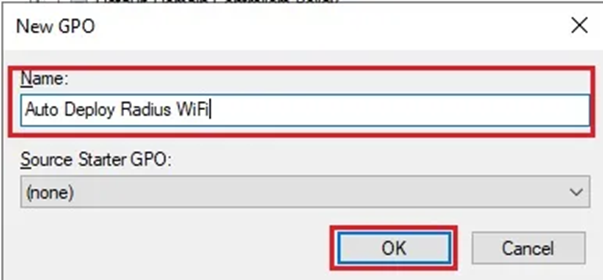
- After giving your policy a distinctive name, click OK, as shown in the screenshot below.

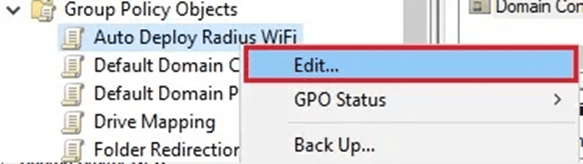
- Find your new policy. After doing a right-click, select Edit.

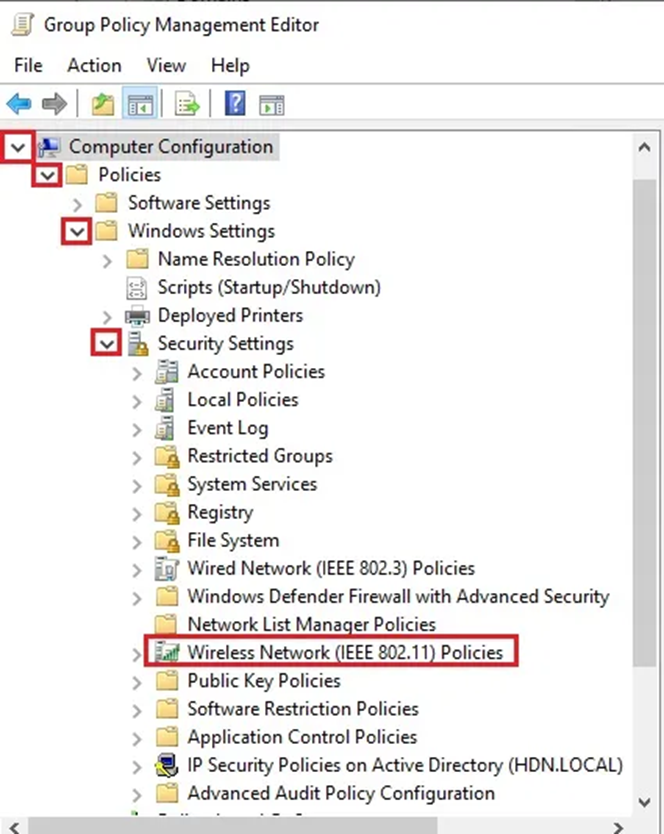
- Extend to the subsequent Computer Configuration > Policies > Windows Settings > Security Settings > Wireless Network (IEEE 802.11 Policies). The screenshot below shows what the Group Policy Management Editor navigation tree looks like.

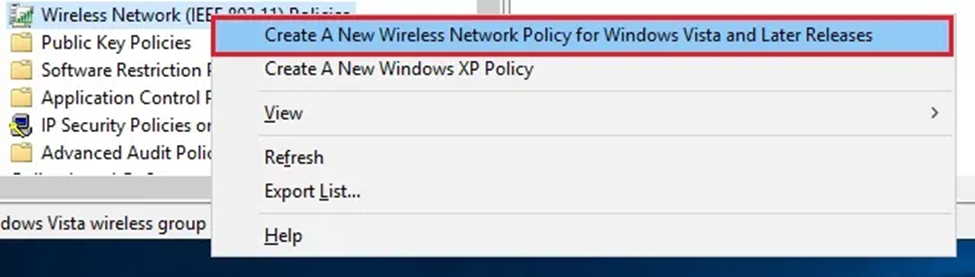
- Right click Wireless Network (IEEE 802.11 Policies) and select Create A New Wireless Network Policy for Windows Vista and Later Releases. The screenshot below shows this menu.

- Give your policy name a clear and detailed meaning.
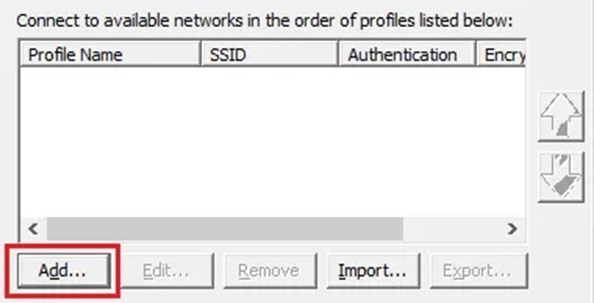
- Select Add from the General tab, as shown in the screenshot below.

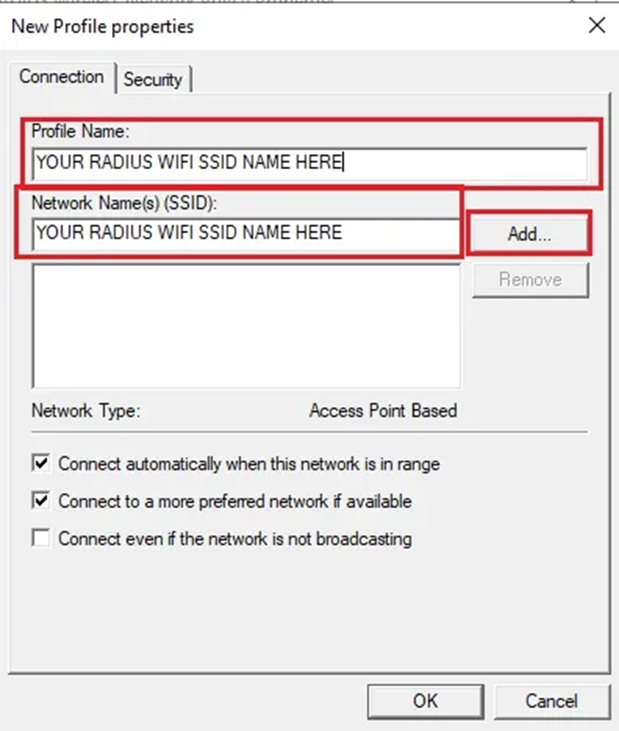
- Give your new profile a name. After entering your SSID, click Add, as seen in the screenshot below.

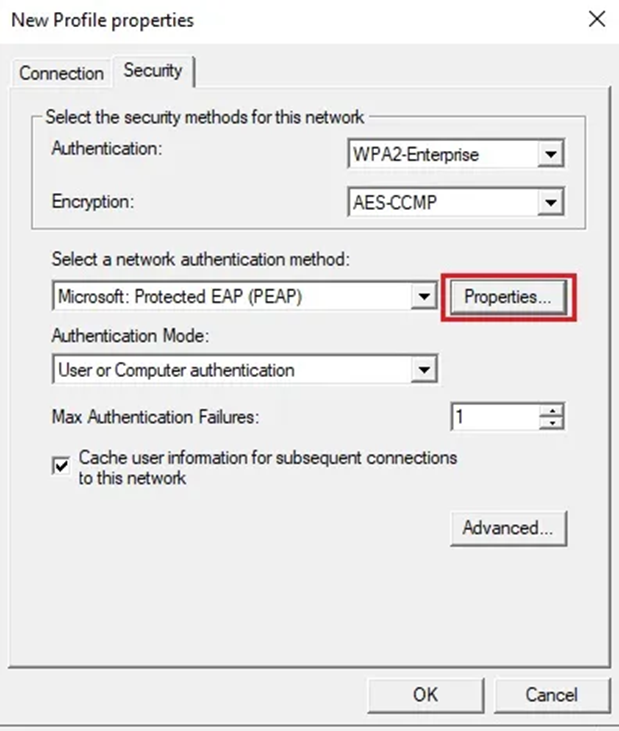
- Select the Security tab. Next, select Properties, as shown in the screenshot below.
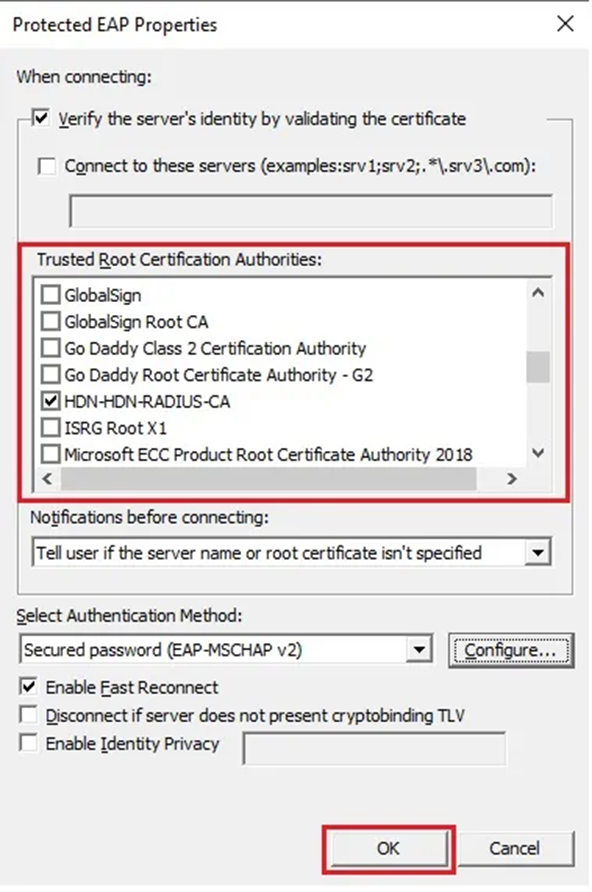
- For your RADIUS, find the Trusted Root Certification Authority and choose it by clicking OK, as shown in the screenshot below.

- After selecting OK on each menu, select Apply.
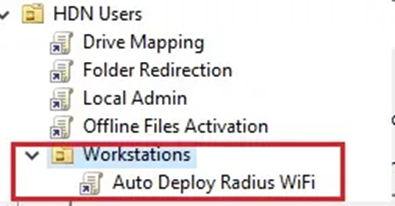
- Connect your Auto Deploy RADIUS Wi-Fi Policy to the OU containing the workstations now. The screenshot below shows how to select Workstations from the tree under HDN users.

- After performing the Group Policy update, restart the computer. Your RADIUS Wi-Fi SSID should now be automatically recognizable to your users.
Migrating from On-Premise GPO to Cloud-Centric Intune
As organizations move from on-premises Group Policy to cloud-based device management, Microsoft Intune provides a centralized platform for configuring, managing, and securing endpoints.
What Is Intune?
Microsoft Intune is a cloud-based solution for setting up, managing, and securing an organization’s endpoints, including PCs and mobile devices.
Intune includes the following services:
- Windows Autopilot: Automates device setup and configuration
- Microsoft Entra ID (formerly Azure Active Directory): Stores device and user information
- Configuration Manager: Provides on-premises management and application deployment for PCs and servers
- Co-management: Integrates Intune and Configuration Manager, allowing either platform to manage different workload groups
- Windows compatibility reports: Identify application and driver compatibility risks before a Windows feature update is deployed
- Microsoft Intune Admin Center: Provides a web-based interface for managing Intune components
Steps for Migration
Migrating Group Policy Objects (GPOs) to Intune can help you streamline administration operations and improve security compliance across your organization’s devices.
In this part, we’ll walk you through the procedures for backing up your GPOs from the Domain Controller and importing them into Intune, guaranteeing a smooth transition and optimal policy application.
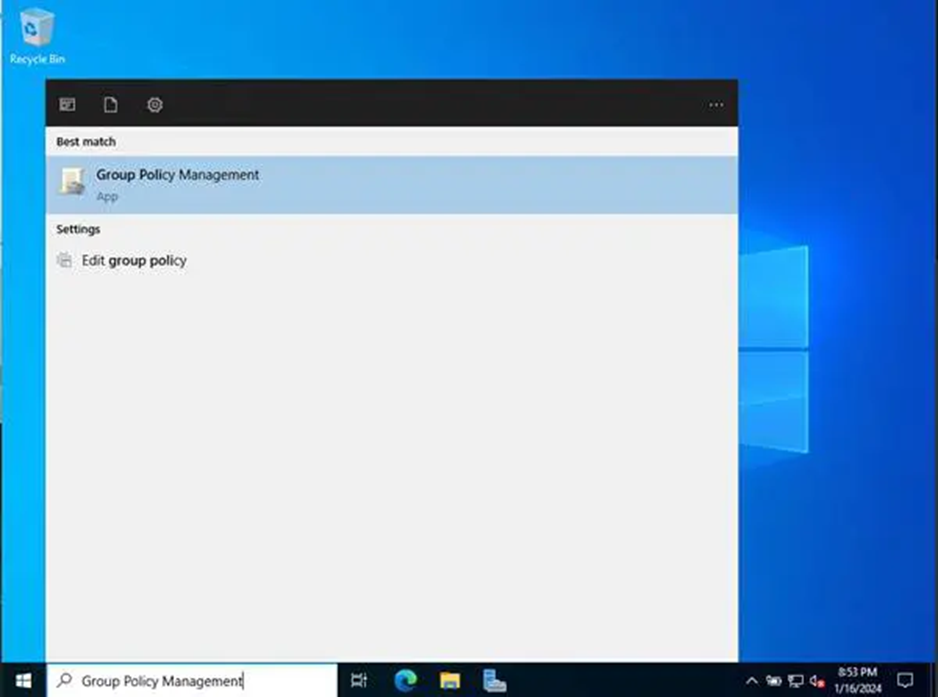
- Go to your Domain Controller and search for Group Policy Management, as shown in the screenshot below.

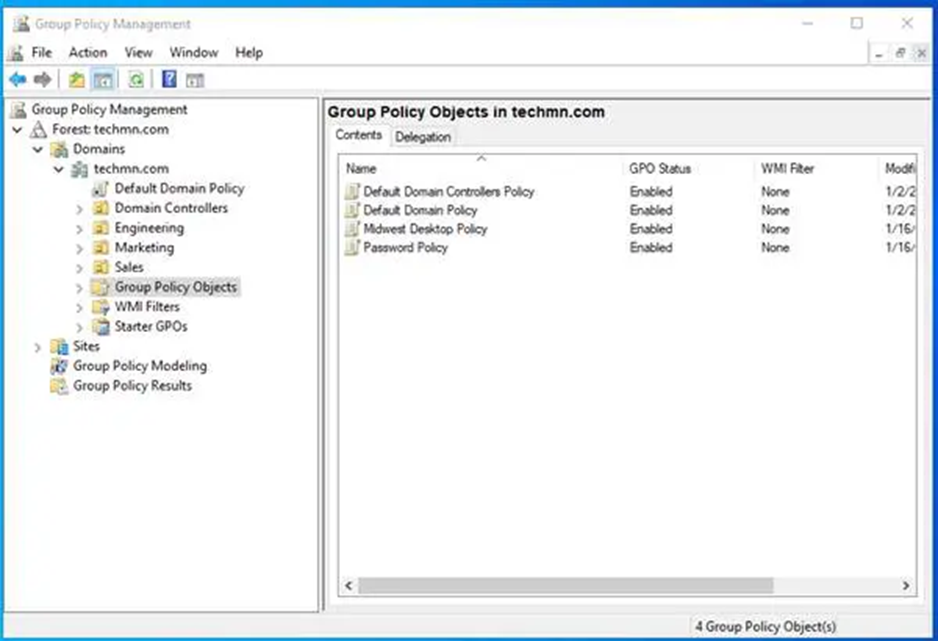
- Go to the Group Policy Objects OU. There, you will see the Group Policy Objects that you have in place, as shown in the screenshot below.

- Clicking on Group Policy Objects displays all of the Group Policy Objects in your domain. Choose the GPOs you wish to back up by right-clicking them and selecting Save Report. Save the file as .XML.
- Select the location where you want to back up the Group Policy Objects. Set a description to assist in identifying between backups if you have more than one. Also, ensure that the format is set to XML Document.
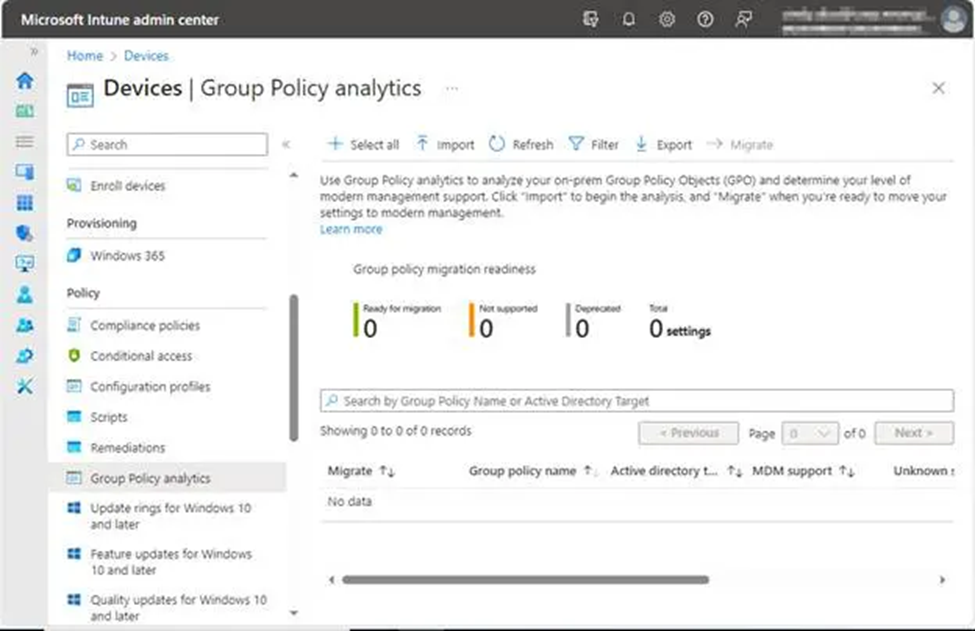
- Now that you have your .XML files, let’s go to Intune and import the GPOs. Navigate to https://intune.microsoft.com/devices > Group Policy Analytics, as shown in the screenshot below.

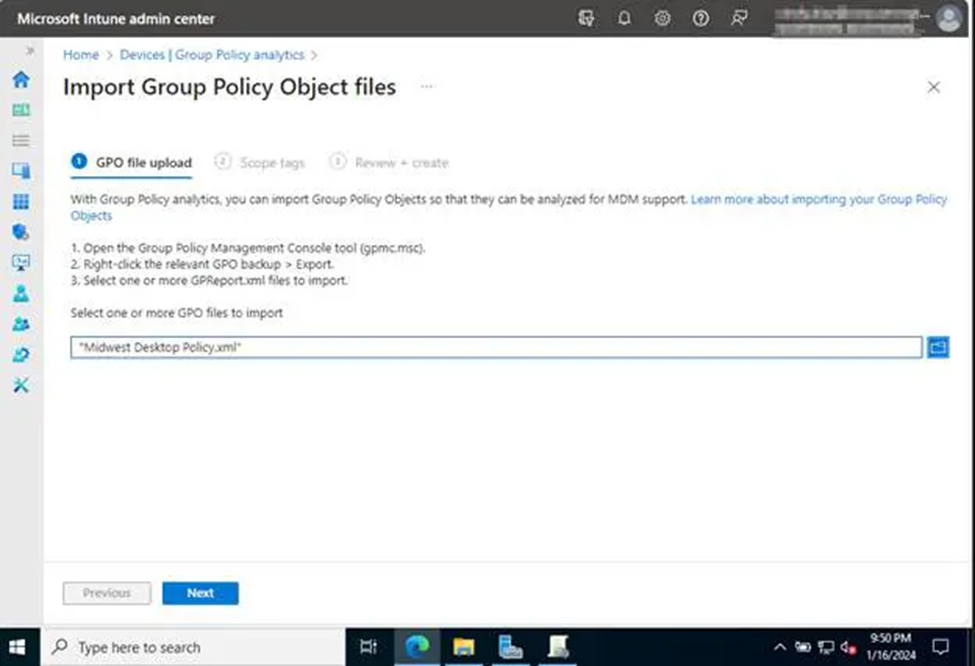
- Click Import. You will be sent to the following screen, which contains information on Group Policy Analytics as well as instructions for exporting and importing your GPOs. Find it, select the XML files we saved previously for import, then click Next, as shown in the screenshot below.

- After selecting Next, you will be required to provide any scope tags.
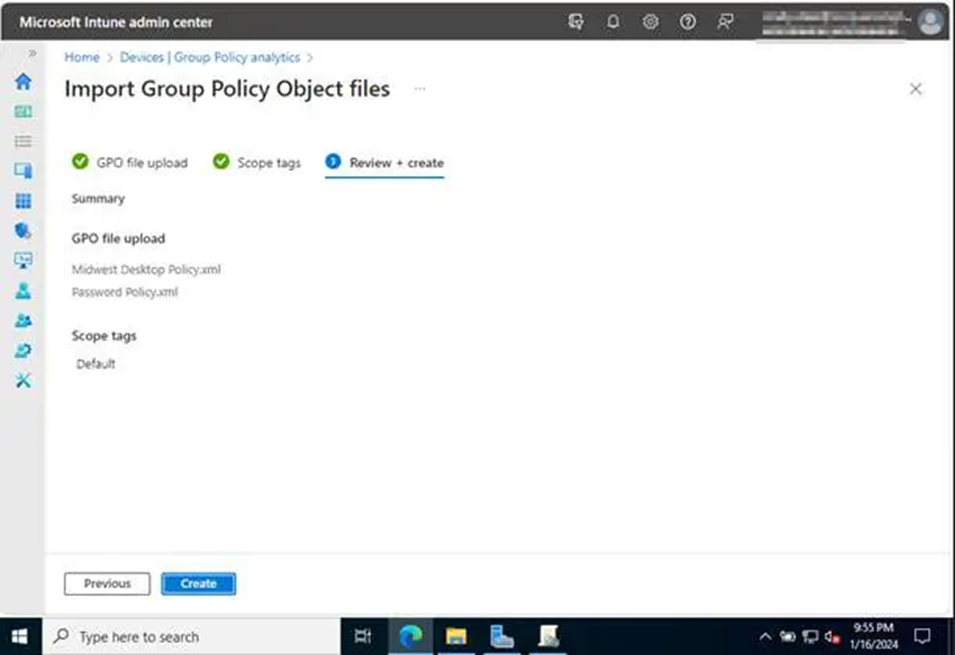
- Check that you’ve included all the imports and scope tags and allocated them to the appropriate locations. When you’re done, click Create to see your results, as shown in the screenshot below.

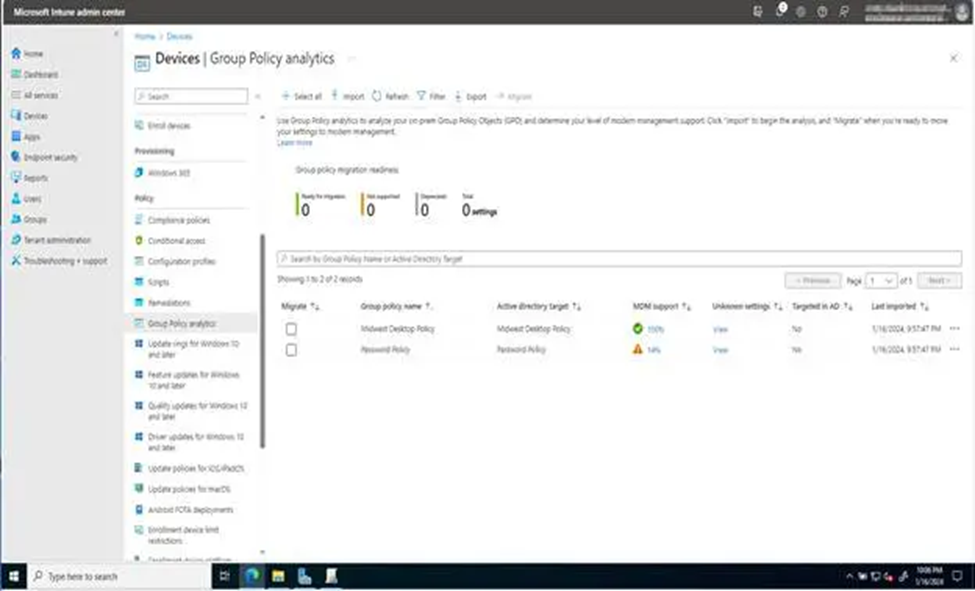
- Once we’ve imported those, your Group Policies will appear on the screen. In this situation, we’ve included both the Midwest Desktop Policy and the Password Policy. We can see that Midwest Desktop Policy fully supports MDM, which implies that all GPO settings may be converted to CSP. The screenshot below shows you what the Intune Group policy analytics page looks like.

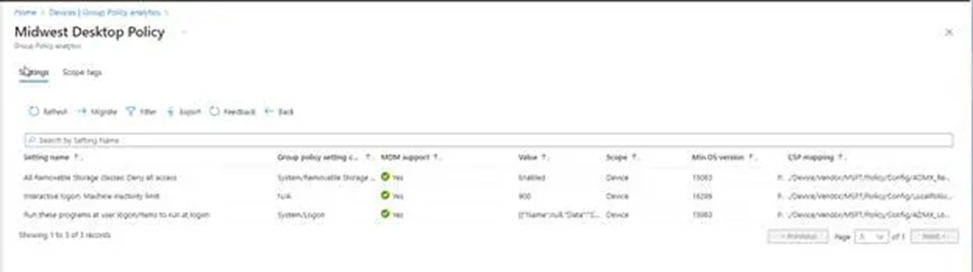
- Click 100% under MDM Support to learn more about the policies that may be moved. You may see the minimum operating system (OS) version required, the CSP Mapping (which displays the OMA-URI route for the on-premises policy), and other settings-related information. You can see the Midwest Desktop Policy settings in Intune in the screenshot below.

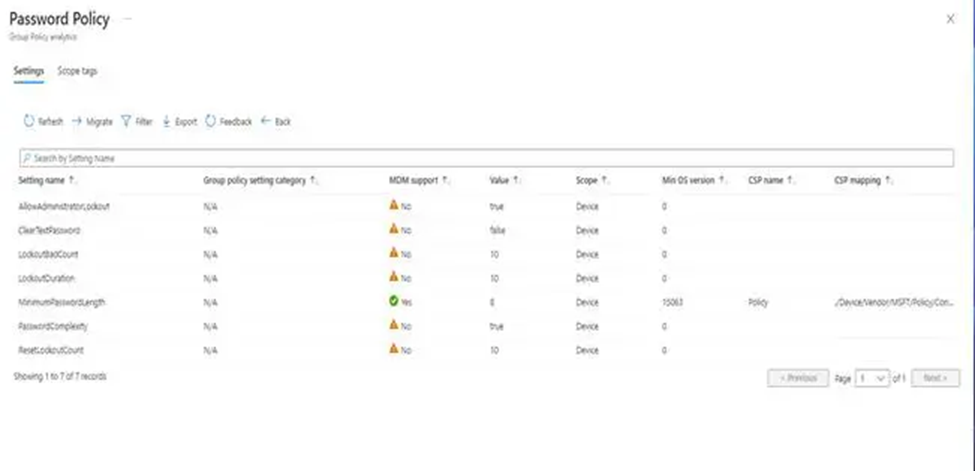
- After clicking on 14% under MDM Support, you’ll be taken to GPO Analytics, which doesn’t produce outstanding data. The reason we see No under MDM support is because these GPOs do not have settings that can be converted into MDM settings. You can see the password policy settings panel in the screenshot below.

- Return to Group Policy Analytics and choose the GPO with 100% MDM support. Then select Migrate.
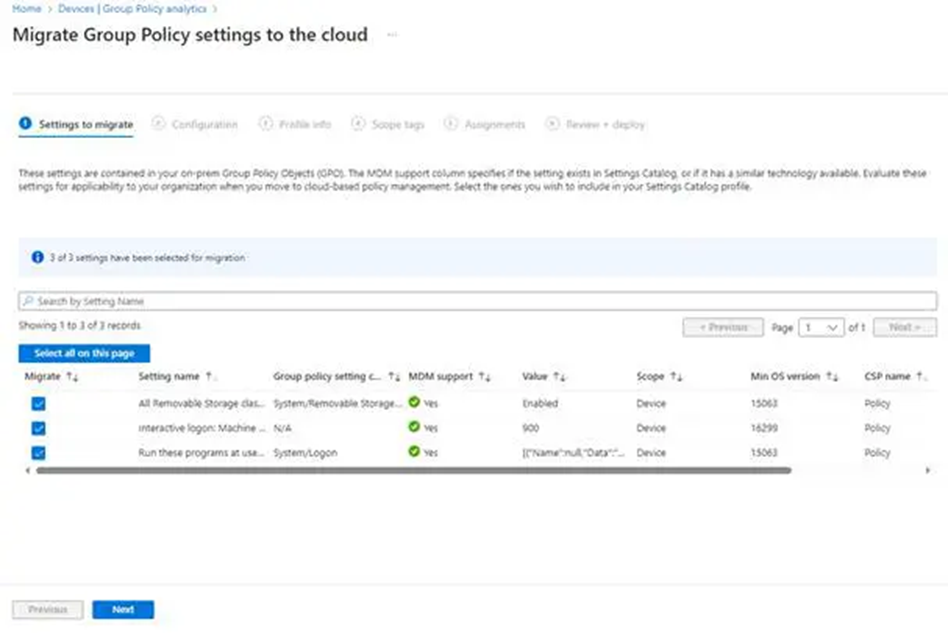
- Once you click Migrate, you will be sent to the following screen, where you may select all of the settings you wish to move to Intune. The screenshot below shows the Migrate Group Policy settings in Intune.Note: You should test these settings with a trial group before migrating and activating them in your environment.

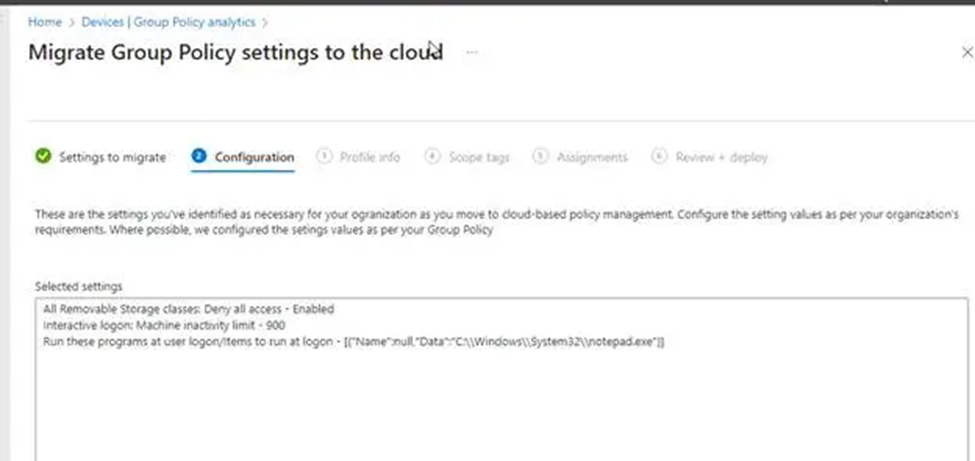
- Next, on the settings page, we’ll see where GPO Analytics has set catalog policies based on our imported GPOs; you can see this in the screenshot below.

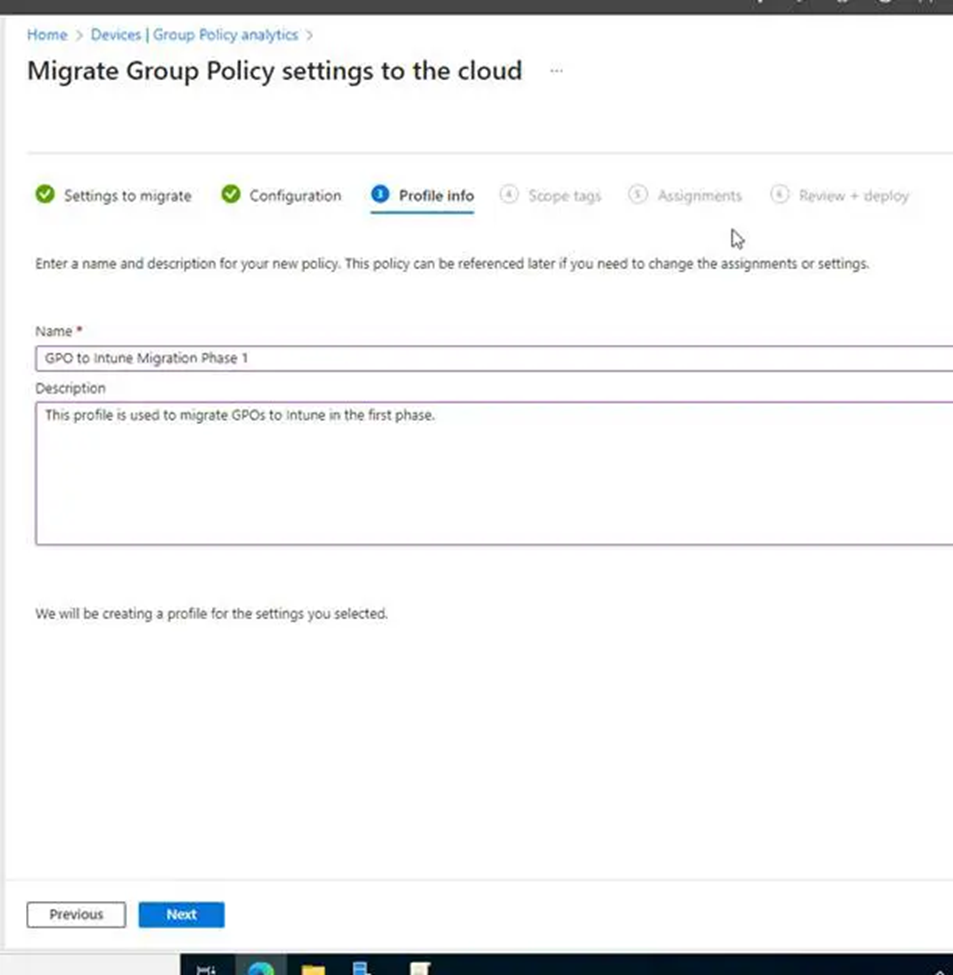
- The following settings will take us to the Profile details page, where we may name and describe this migration for future reference. Click Next to proceed, as shown in the screenshot below.

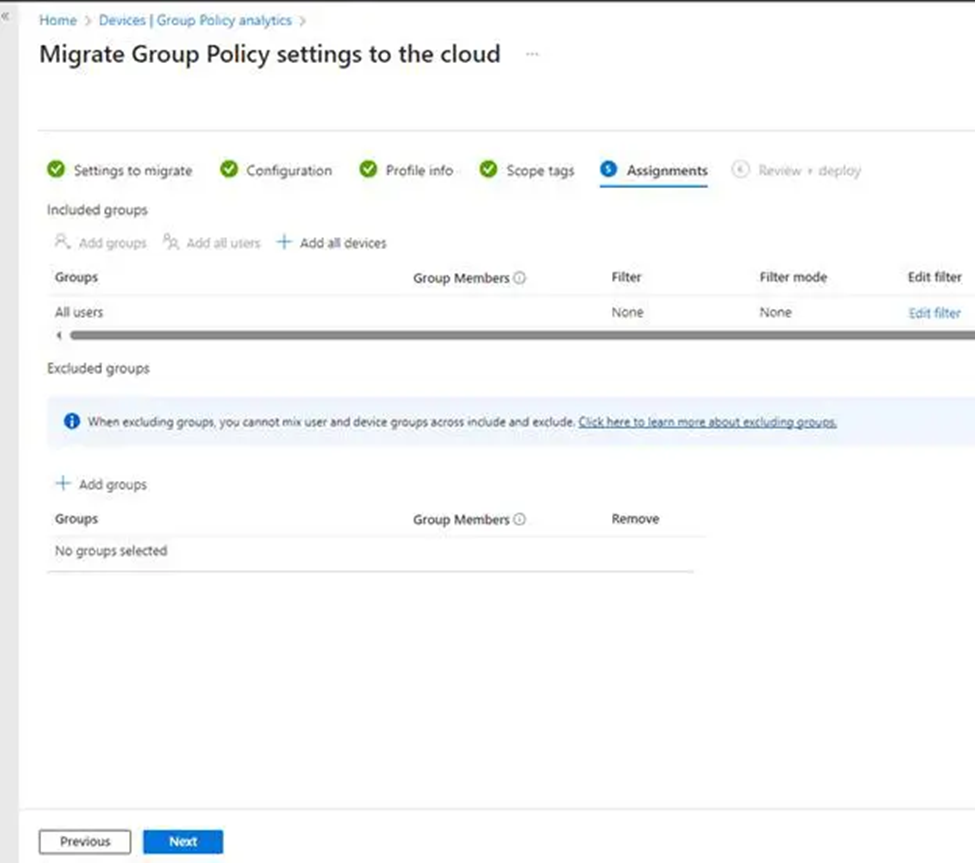
- We didn’t have any scope tags, so click Next and go to Assignments. Here, decide who gets these settings. You can pick Add all users; however, keep in mind that you should test this before deploying it to your whole system. Click Next to review your migration, as shown in the image below.

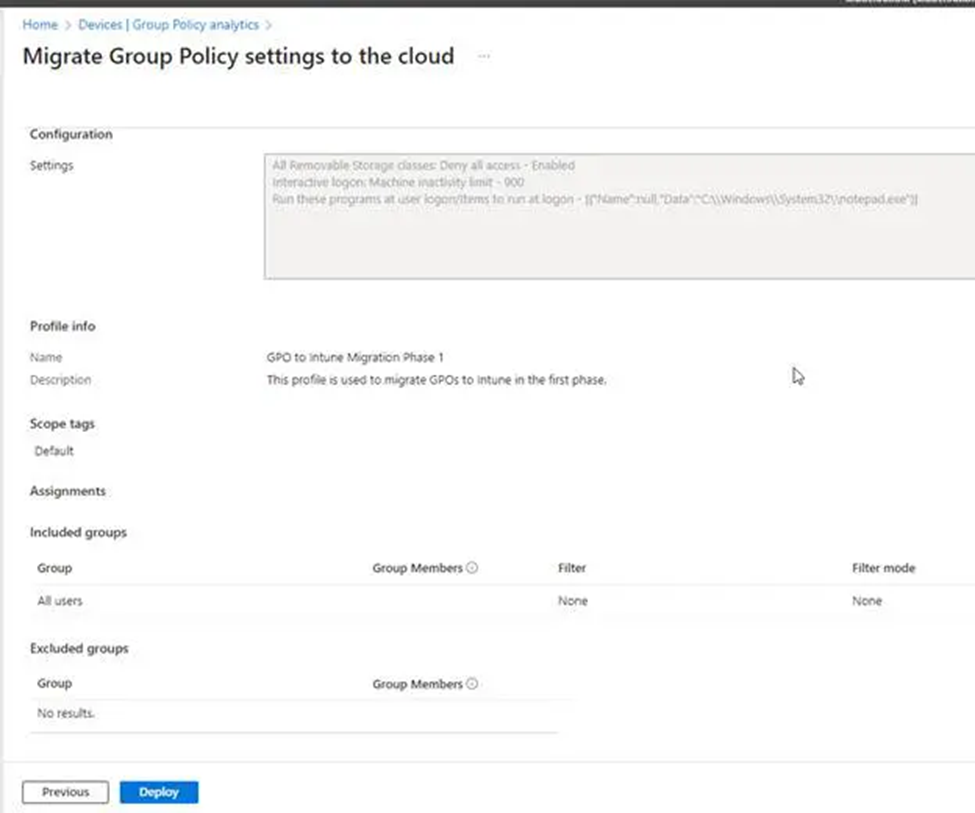
- Review and verify that everything appears to be in order, then deploy when ready, as shown in the screenshot below.

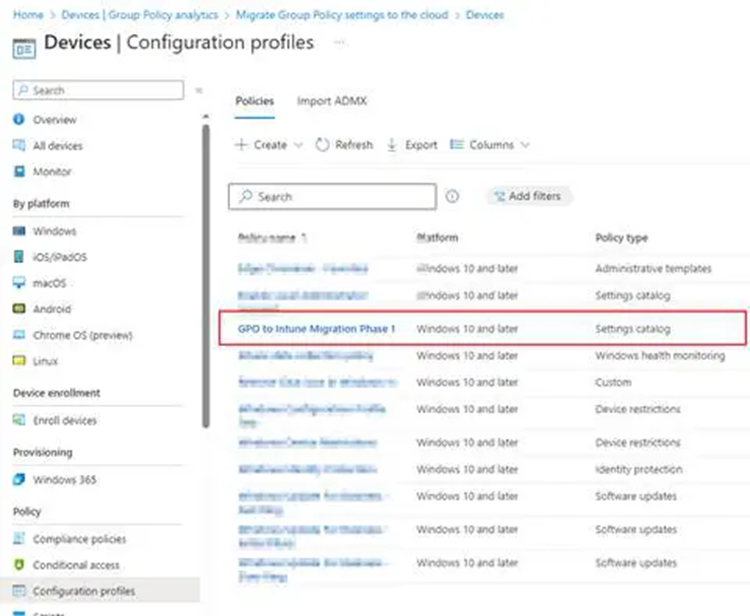
- After deployment, we can see that our GPO migration is now listed in the Configuration profile under the profile name we assigned it before. The settings also moved correctly, as shown in the screenshot below.

Device Compliance Policies in Intune
Policies for Intune compliance are separated into two categories:
- Compliance policy settings are tenant-wide customizations that function similarly to a built-in compliance policy that each device gets. The settings for compliance policies determine how the policy operates in your Intune environment, including how to handle devices that don’t have a specific device compliance policy assigned to them.
- Device compliance policies are separate collections of platform-specific rules and settings that you apply to groups of users or devices. Devices report the status of device compliance by analyzing the policy’s requirements. One or more noncompliance-related actions may follow a noncompliant status. Microsoft Entra Conditional Access control may also use that status to prevent that device from accessing organizational resources.
These compliance capabilities complement the Wi-Fi deployment process by giving administrators greater control over the devices that access organizational resources.
For organizations moving from traditional Group Policy management to cloud-based device management, Intune can provide a centralized way to manage device configuration and compliance.
Move Beyond On-Premises RADIUS With a Cloud-Native Authentication Stack
On-premises RADIUS servers carry hefty maintenance costs and an increased risk of hardware failure.
Our Cloud RADIUS eliminates operational overhead while strengthening security.
It authenticates users and devices using live security signals from your identity provider, MDM, and EDR/XDR platforms, so access decisions reflect current device posture, not a stale snapshot from last week’s sync.
The result is authentication that scales with the organization, not against it. Teams that have replaced legacy RADIUS with SecureW2 Cloud RADIUS consistently report faster authentication times, fewer outages, and best-in-class uptime, and the option for 99.999% availability.
If your current RADIUS setup is creating friction for IT or leaving security gaps, there is a better path. See SecureW2 Cloud RADIUS in action.
Frequently Asked Questions
What GPO Wi-Fi settings are needed for RADIUS authentication?
The key settings include the SSID/profile name, the Security tab configuration that specifies the appropriate authentication method, and the Trusted Root Certification Authority for your RADIUS server. These settings are configured under Computer Configuration > Windows Settings > Security Settings > Wireless Network (IEEE 802.11) Policies.
What does a RADIUS server for Wi-Fi need?
A RADIUS server used for Wi-Fi authentication needs a certificate issued by a trusted Certificate Authority (CA), each access point configured as a RADIUS client with a shared secret, and a user database for authentication.
How does Active Directory Wi-Fi authentication work?
Active Directory Wi-Fi authentication typically uses WPA2-Enterprise with 802.1X. The wireless client (supplicant) authenticates through the access point (authenticator) against a RADIUS server, such as Windows NPS, which is integrated with Active Directory to authenticate users against their AD credentials.
