A Guide to RADIUS Server Certificates
Any time one accesses the internet, they are interacting with a server certificate, just behind the scenes. HTTPS requires that websites are issued an SSL server certificate to validate their domains and ensure users are connecting to the right place.
RADIUS servers authenticate and authorize clients for network access, an incredibly important job in the infrastructure. It’s imperative they are enrolled with a server certificate so clients can safely connect to the network.
What is a RADIUS Server Certificate?
A RADIUS server is instrumental for network access control by accurately authenticating approved network users. Digital x.509 certificates are used to confirm the identity of the client to the server, but what about the other way around?
The client needs to also verify the identity of the RADIUS server. A RADIUS server certificate proves to the client that they are connecting to the right server and not fall victim to a Man-in-the-Middle (MITM) attack.
Establishing RADIUS Server Certificate Trust

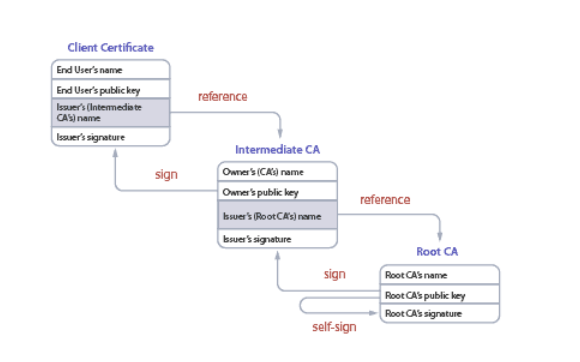
Trust between a client and a RADIUS server is through Server Certificate Validation which basically describes the client verifying the identity of the RADIUS server. An approved network Certificate Authority (CA) that is recognized by the client must sign and issue the server certificate to the RADIUS for trust to be established. If the client and RADIUS server certificates are both signed by the same CA, then this creates a certificate chain of trust.
The certificate chain of trust ensures that both the client and RADIUS server are legitimate. Once the RADIUS shared its server certificate, the client will send its certificate and request authentication to the network.
This is useful to authenticate users for Wi-Fi access for instance because the client can request the Access Point find the RADIUS server with the corresponding certificate configured to control Wi-Fi access and eliminate the risk of MITM attacks.
Certificate Authentication with NPS as a RADIUS Server
NPS is Microsoft’s RADIUS solution and works well with on-premise Active Directory infrastructures.
Here’s a quick overview of NPS setup:
- Set up a Security Group
- In the AD domain, create a security group. Add all of the users that will authenticate through your new RADIUS.
- Add Network Policy and Access Services Role
- The Server Manager console contains the Add Roles and Features wizard. That wizard handles the installation and configuration of all of the optional Windows Server features, including NPS. Choose Network Policy and Access Services from the list.
- Snap-In NPS to AD
- From the Tools tab of Windows Server, find the Network Policy Server option and click it. In the NPS snap-in menu, find the root labeled “NPS (Local)” and right-click on it. Choose “Register server in Active Directory”. Select OK in the confirmation dialogue box that pops up.
- Add RADIUS Client to NPS
- In your NPS console tree should be a RADIUS Clients and Servers folder. Open it, find the RADIUS Clients entry, then right-click it. Choose “New” from the dropdown list. Fill out each field. “Friendly Name” is your client nickname, “Address” can be the IP or DNS name, and “Shared Secret” should have been determined when you configured the access point.
It’s important to note that shared secrets are a weak form of authentication security compared to certificates. Certificates are similarly easy to authorize. Add your access point certificate to the personal certification store on the Local Machine, then request and import the .p12 certificate to the NPS server.
Planning NPS as the RADIUS server is an arduous task, especially if you include AD CS to use certificates. Certificate authentication is worth the involved setup time unless you pick PEAP-MSCHAPv2 as the authentication protocol. PEAP only requires a server certificate for the RADIUS and passwords for the clients.
While the server certificate can verify the server, passwords are not an accurate identifier of clients as they can be easily shared or stolen. One person with the right software can perform a man-in-the-middle attack and convince the RADIUS server that they are an active client with a stolen password. EAP-TLS requires both the client and server are enrolled with a certificate.
Installing Root and Intermediate CA Certificates onto a RADIUS Server
SecureW2’s PKI, the JoinNow Cloud Connector allows Windows admins to install the SecureW2 CA on their servers. There’s no need to manually port the CA to the RADIUS server because it’s done automatically when an admin creates a CA in our Management Portal
A signed certificate from the CA will be enrolled onto the RADIUS server so accurate certificate authentication can be performed. When a client is enrolled with a certificate using our JoinNow MultiOS service, the CA will be uploaded onto the client’s certificate store. The client is able to trust the certificate if the RADIUS server certificate is signed by an approved CA that is active in the client’s certificate store.
Here’s a basic overview for configuring your RADIUS server with SecureW2 CA to enroll the server with a server certificate:
- Configure the Secure SSID
- A best practice is to configure a secure SSID with certificate authentication and WPA2-Enterprise. Once clients have been enrolled with a certificate, they can connect to the SSID efficiently and without interruption.
- Integrate your RADIUS Server with SecureW2’s PKI
- The SecureW2 PKI configuration allows you to add the Root and Intermediate CAs to your RADIUS server’s trusted list. Clients can present their certificates and the RADIUS server can authenticate them.
- Configure Authentication and Authorization Policies on your RADIUS Server
- In order to authenticate clients, the authentication policy needs to be configured on the RADIUS. The policy specifies what authentication protocol is being used. EAP-TLS is strongly recommended, but PEAP-MSCHAPv2 is also accepted.
- After authentication, the RADIUS will begin the authorization process. After the client certificate is validated, the RADIUS can simply send an “Access-Accept” or segment the client based on other policies.
- Configure your Identity Provider for RADIUS Authentication
- Configuring the Identity Provider can either be in the form of a Certificate Revocation List (CRL) check or Identity Lookup.
- CRL: The RADIUS server will check the certificate’s expiration date and determine if it’s a current date or expired.
- Identity Lookup: The RADIUS server will check the client’s status in the organization and determine if they’re still active in the network.
- Configuring the Identity Provider can either be in the form of a Certificate Revocation List (CRL) check or Identity Lookup.
While SecureW2’s JoinNow Connector and MultiOS onboarding service can guarantee certificate authentication for domain resources, continuing to use older on-premise systems is frustrating when cloud solutions are becoming the standard. Fortunately, admins can configure certificate authentication with a cloud-based RADIUS.
Certificate Authentication with Cloud RADIUS

The industry as a whole is gradually adopting newer cloud-based systems and many admins find it annoying to build on top of older technology, which is what Microsoft loves to do. Thousands of customers are moving away from implementing and managing their own RADIUS server for a cloud-based option. Cloud-based RADIUS solutions succeed where their on-prem counterpart fails: easy implementation, cost-effective, and strong security measures.
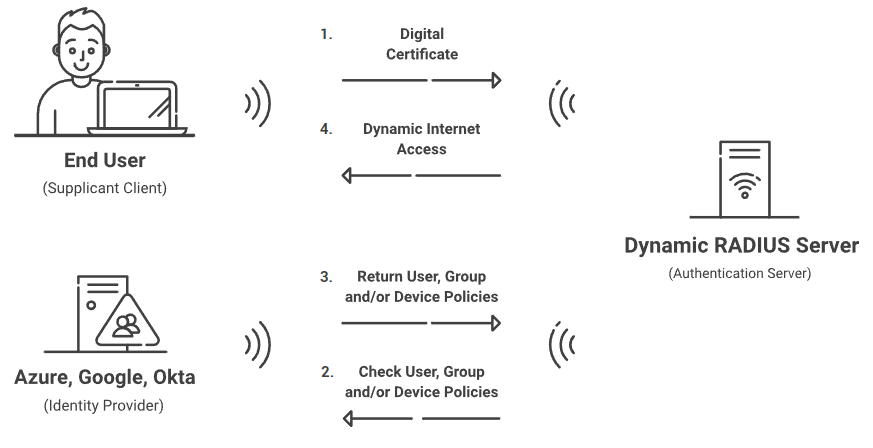
Cloud RADIUS is a turnkey RADIUS solution that can be implemented into virtually any environment because it works with all major SAML and LDAP Identity Providers like Google, Okta, and Azure. Designed from the ground up for certificate-based authentication, it eliminates the risk of sending credentials over the internet and eliminates the risk for credential theft.
Cloud RADIUS is the only RADIUS Server that comes with an industry-exclusive Dynamic Policy Engine that integrates natively with Azure and Intune, empowering organizations with certificate-based authentication for ultra-secure Wi-Fi and VPN authentication.
Security and user experience are bolstered by Cloud RADIUS because it performs digital certificate-based authentication and comes set up with SecureW2’s Managed Cloud PKI. Our PKI gives admins the ability to effortlessly deploy WPA2-Enterprise with 802.1x authentication, the gold standard for wireless security. Everything you need for certificate-based authentication can be set up in under an hour! Check out low-cost solutions like SecureW2’s PKI and Cloud RADIUS to see if combining our certificate solutions will work to authenticate your users to network resources.