Configuring SecureW2 Cloud RADIUS with Microsoft Cloud PKI
Microsoft Cloud PKI, a recent addition to Intune suite of services, enables organizations to issue certificates to Intune-managed devices. We at SecureW2 have been advocating for certificate-driven authentication for more than a decade, and are really excited about Microsoft’s new PKI enabling certificate authentication for many small organizations that historically couldn’t leverage certs.
However, as many intend to use their certificates for Wi-Fi authentication, new Microsoft Cloud PKI customers have approached us to authenticate their new certificates with Cloud RADIUS. In this article, we’ve documented how you can integrate the two systems and enable certificate-driven network authentication.
Prerequisites:
- Microsoft Intune Suite license or Microsoft Cloud PKI standalone Intune add-ons license. For more information on Microsoft licensing options visit Microsoft Intune licensing
- SecureW2’s Cloud RADIUS licensing
- Test device – Windows 10 or later
High-level steps:
Below are the high-level configuration steps you will need to follow to integrate Microsoft Cloud PKI with SecureW2’s Cloud RADIUS
- Create Root and Intermediate CA in Microsoft Cloud PKI
- Import these Root and Intermediate CAs into JoinNow Management Portal
- Create a Network profile in JoinNow Management portal for authentication with Microsoft PKI
- Create Azure Entra ID Lookup policy in JoinNow Management portal
- Create Trusted Certificate Profiles in Intune
- Create SCEP Profile in Intune
- Create Wi-Fi Profile in Intune
- Set up your Network Controller to use SecureW2’s Cloud RADIUS
Create Root and Intermediate CA in Microsoft Cloud PKI
- Goto Intune -> Tenant Administration -> Cloud PKI -> Create
2. Create both Root and Intermediate CAs. Refer Microsoft documentation for detailed step-by-step instructions.

3. Next download both the certificates and save it.
4. Note the CRL point URL from Root and Intermediate CA to upload it into JoinNow Management portal.
5. Note the SCEP URI in Intermediate CA by clicking Properties option. This will come in handy when creating a Certificate profile for SCEP.
Upload the Microsoft Root and Intermediate CAs in the JoinNow Management portal
This step is required to form a Trust between SecureW2 Cloud RADIUS and your Cloud PKI tenant in Microsoft.
- Go to PKI Management > Certificate Authorities and click Import Certificate Authority
- In the Basic section, from the Type drop-down list, select the type of authentication as Certificate and choose Import CA for as ‘Device and User Authentication’
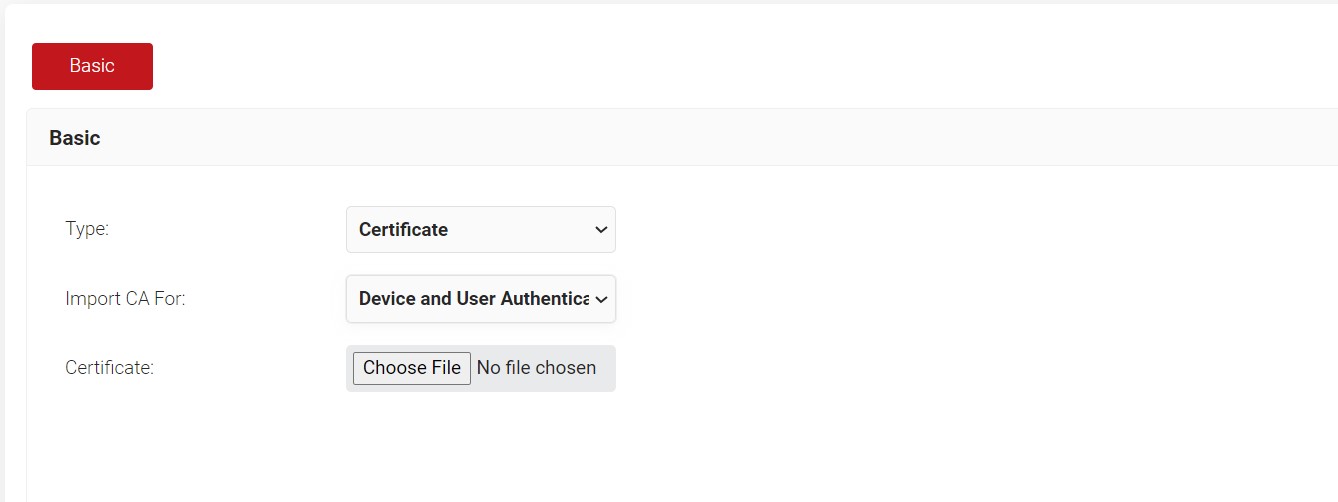
3. In the Certificate option, upload the Root CA that you downloaded from Intune.
4. Use the CRL info that you noted for Root CA as well and set the preferred Update frequency
Repeat the same process for the second time for Intermediate CA
Now you have Imported both the Root and Intermediate CA from Microsoft Cloud PKI into your JoinNow Management portal.
Create a Network profile in JoinNow Management portal for authentication with Microsoft PKI
This step is required to download the Cloud RADIUS server certificate to be used for creating a Trusted Certificate Profile in Intune. If you already have a Network Profile in place, this step could be avoided.
- Navigate to the Network Profile Generator page:
- Go to Device Onboarding > Getting Started.
- Enter values for the required fields:
- Profile Type: Select the network profile type from the drop-down list.
- SSID: Type a name for the SSID in the text box (Note: You will be adding an SSID name, even though it will not be used).
- Security Type: Select WPA2-Enterprise from the drop-down list.
- Authentication Framework: Select the TLS authentication framework from the drop-down list.
- Save the profile:
- Click Save.
- Revisit the Profile and download the RADIUS server certificate from it. This is required to set a Trusted Certificate Profile in Intune.

Create Azure Entra ID Lookup policy in JoinNow Management portal

SecureW2’s Cloud RADIUS has been engineered to look up if a user/device is still active and check any attribute at the moment of authentication. This is important as Microsoft’s Cloud PKI is using just a basic SCEP, a static URL that hackers can easily abuse to issue themselves certificates from the same trusted CA. Configuring a lookup will prove the authenticity of a user/device. This will also come in handy during VLAN authorization and hence Network policy assignment.
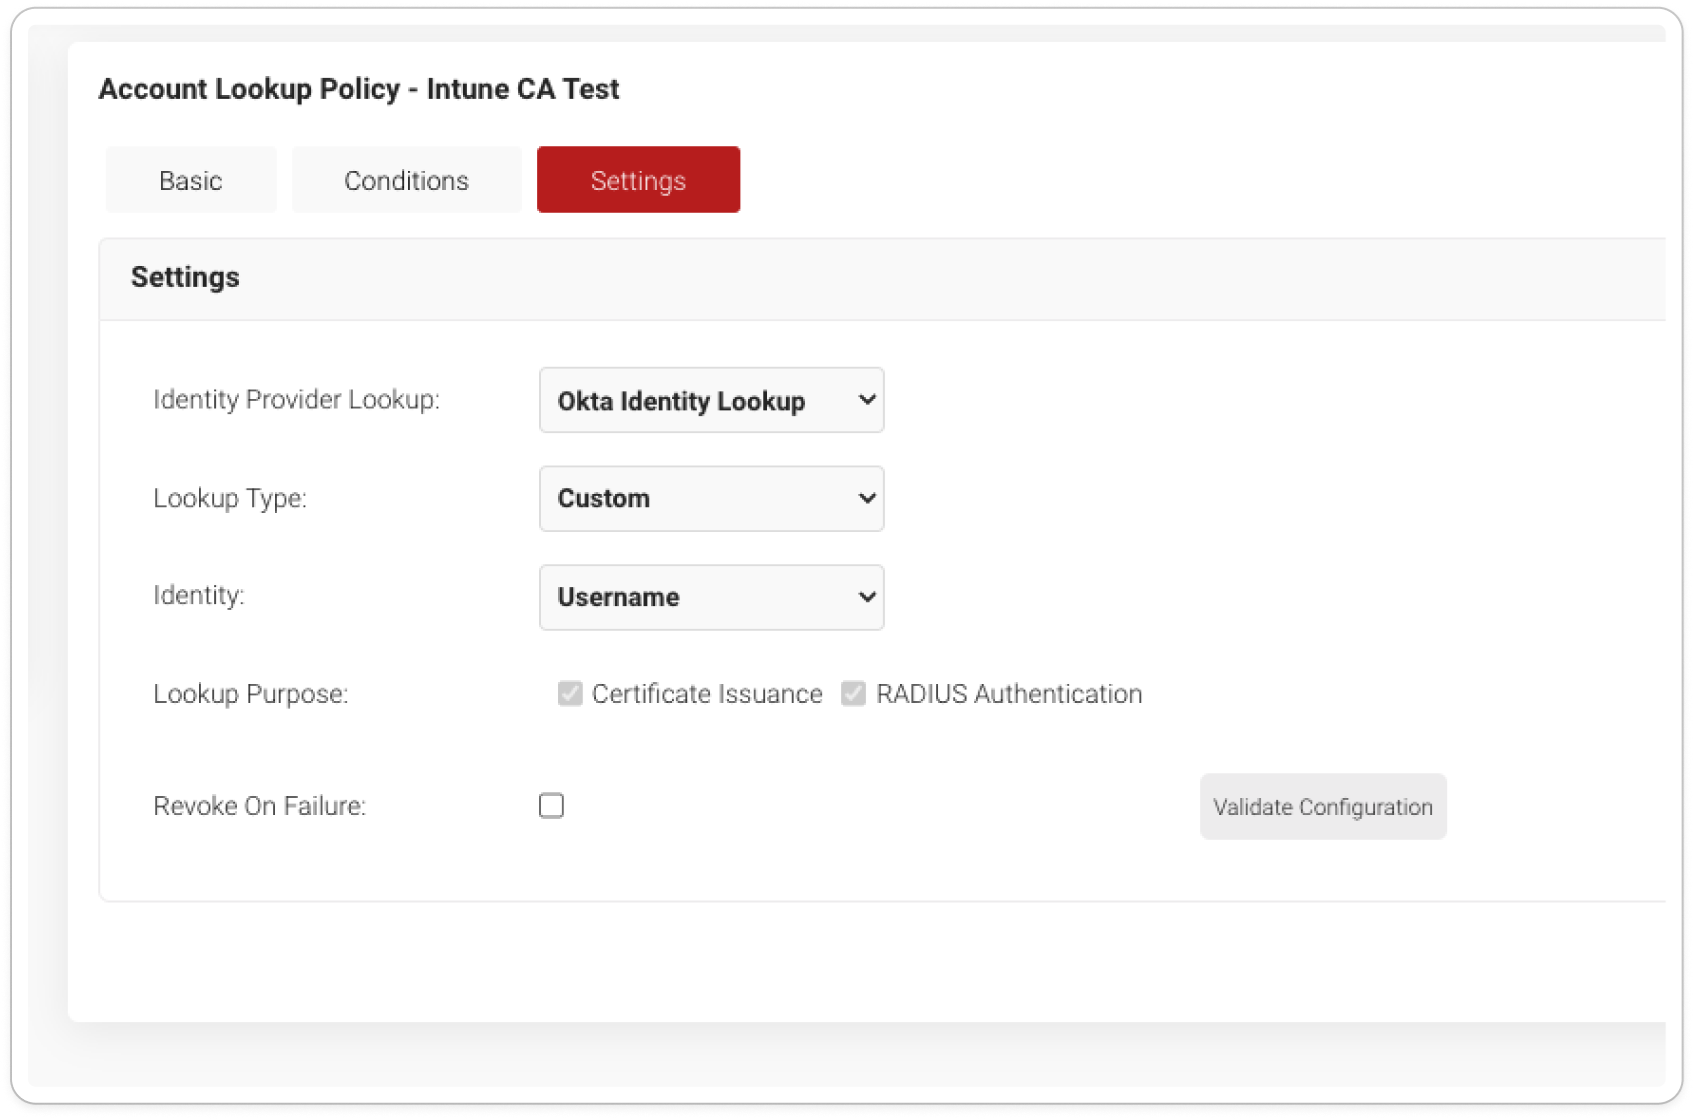
Refer to configurations IV and V of our documentation to reap the benefits of this value-add.
Create Trusted Certificate profiles in Intune
You will need to create the following Trusted Cert profiles
- Root CA
- Intermediate CA
- RADIUS Certificate
In Intune go to Devices > Configuration profiles > Create profile.
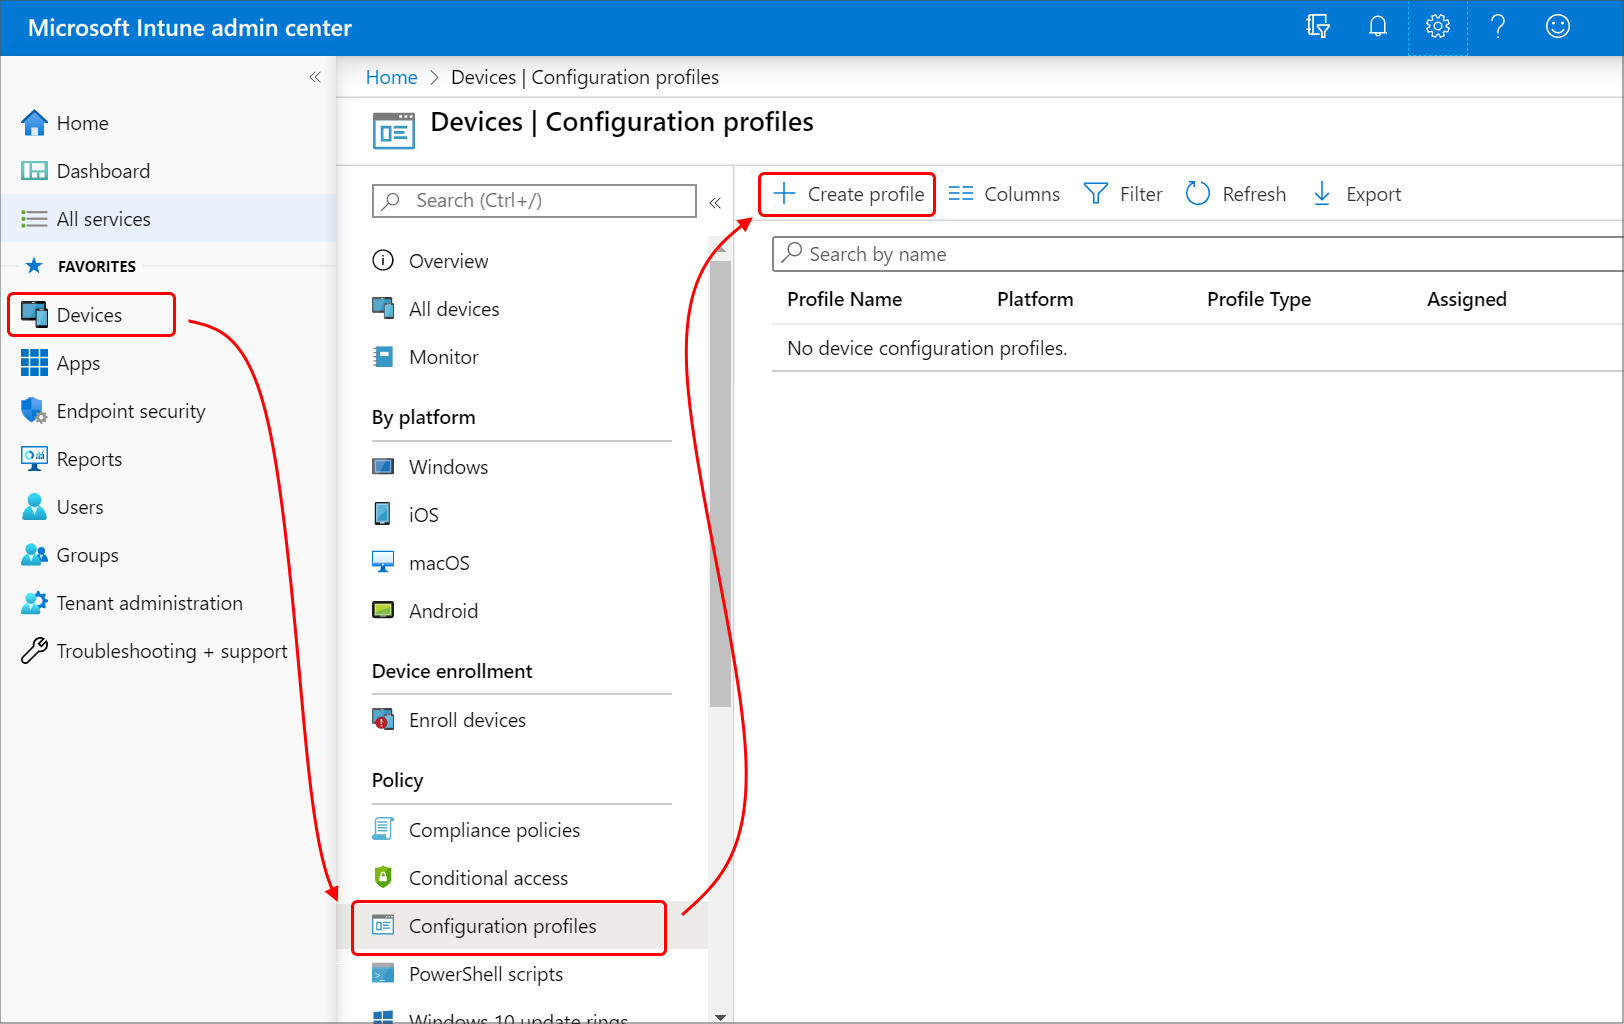
4. On the Create a profile page, from the Platform drop-down list, select Windows 10 and later for the trusted certificate.
5. From the Profile type drop-down list, select Templates, and then select Trusted certificate. Click Create.
6. On the Trusted certificate page, type a name and description for the trusted certificate profile and then click Next.
7. Add the Root certificate you saved earlier by clicking the Browse button Click Next.
8. Assign the profile to appropriate Groups and Rules, review it and click Create.
Repeat the same steps for Intermediate CA and RADIUS certificate as well and upload the corresponding certificates on each profile.
Create SCEP Profile in Intune
- In Intune select Devices > Configuration profiles > Create profile.
- In the Create a profile page, from the Platform drop-down list, select Windows 10 and later for the SCEP certificate profiles.
- From the Profile type drop-down list, select Templates to configure the devices and access the Wi-Fi network.
- From the Template name drop-down list, select SCEP certificate to enable certificate-based authentication in your organization.
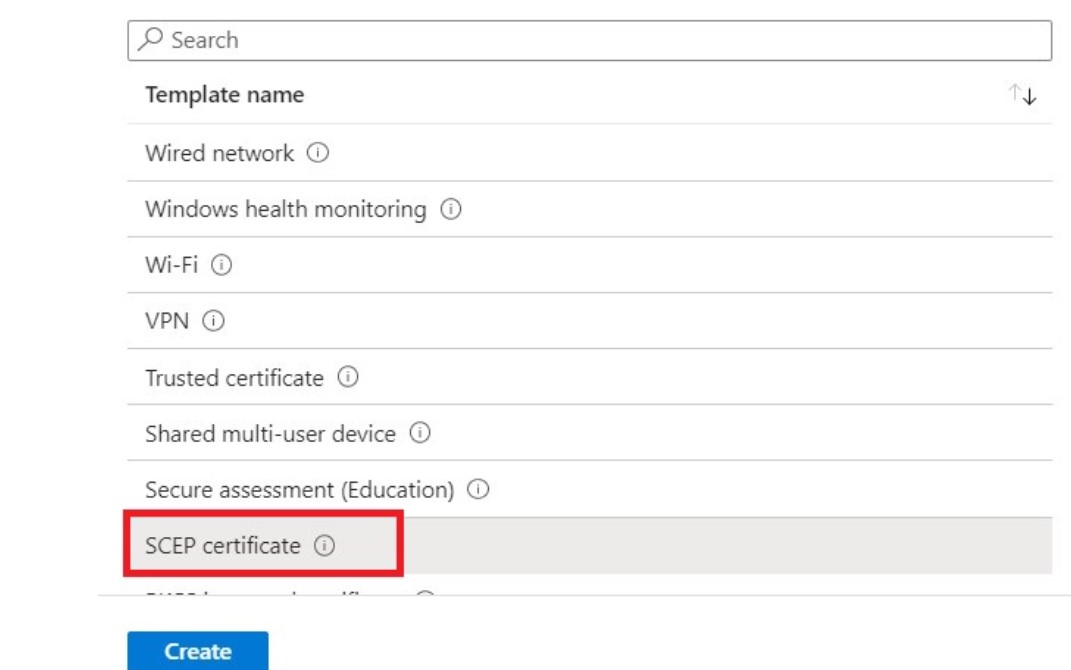
5. Click Create.
6. On the SCEP certificate page, in the Basics section, for the Name field, enter the name of the SCEP certificate.
7. In the Description field, enter a suitable description for the SCEP certificate.
8. Click Next.
9. In the Configuration settings section, from the Certificate type drop-down list, select User to connect to the network using a user certificate.
10. In the Subject name format field, type a name where Microsoft Intune automatically creates a subject name in the certificate request. Select one of the following options:
CN= UserName
E= EmailAddress
11. In the Subject alternative name field, from the Attribute drop-down list, select Email address and enter the following values:
- UPN : {{EmailAddress}}
- Email address : {{EmailAddress}}
- DNS : {{AAD_Device_ID}}
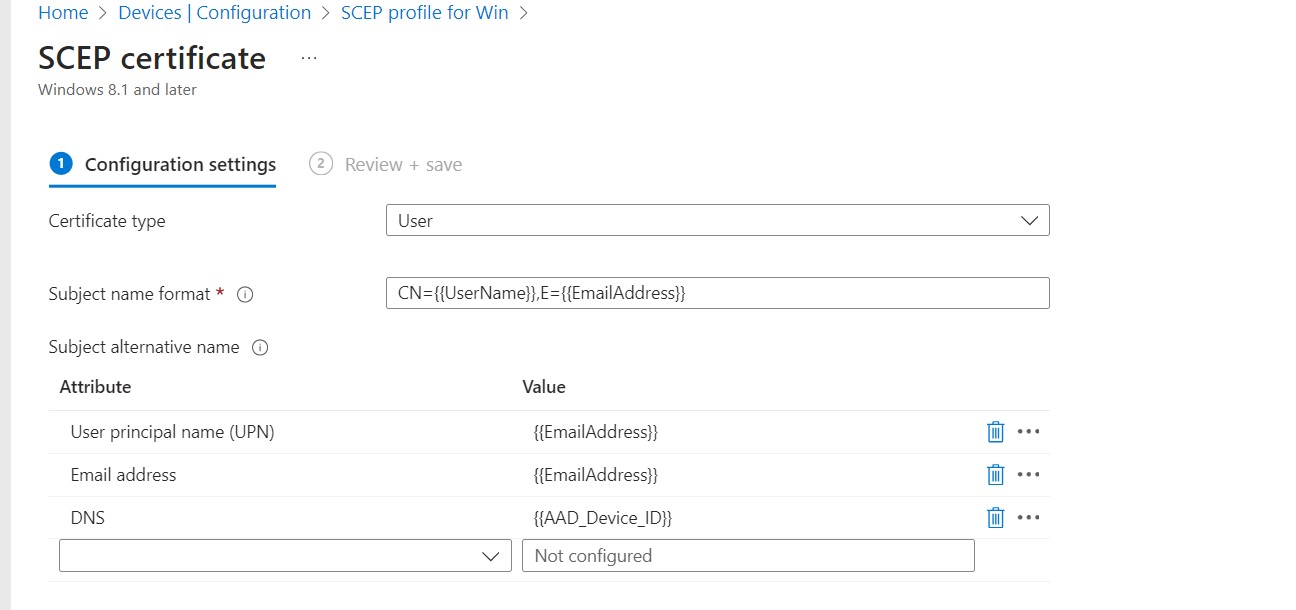
12. Keep the rest of the settings as required, ours is shown below.
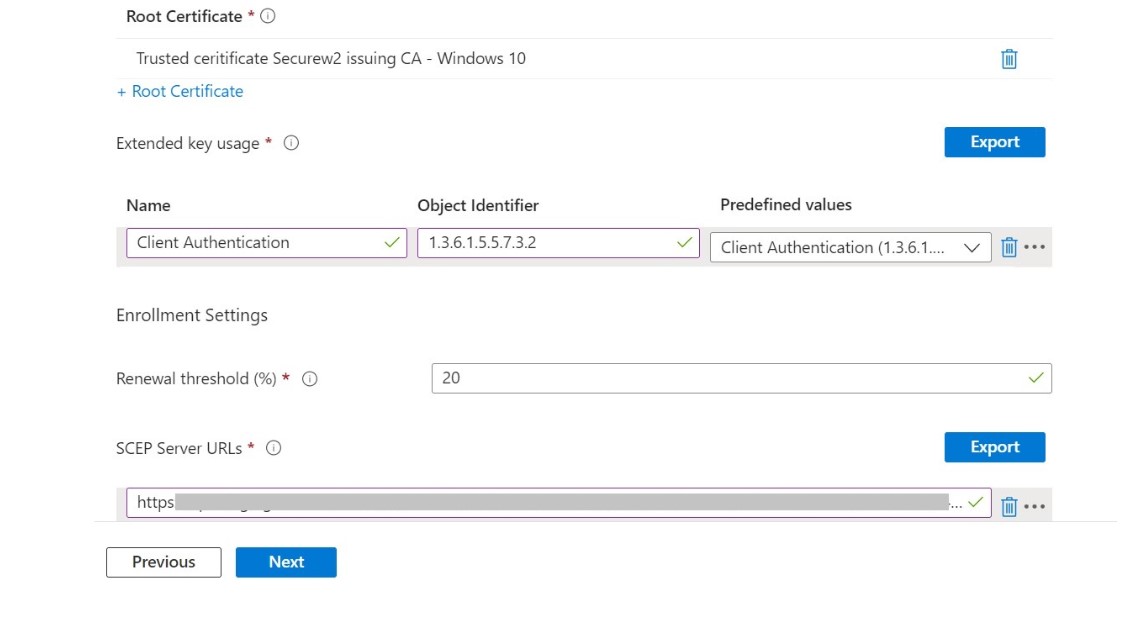
13. For Root Certificate, choose the Trusted Certificate profile you created for Root CA with Microsoft Cloud PKI.
14. Under the Extended key usage section, add values for the certificate’s intended purpose. In most cases, the certificate requires client authentication for the device to authenticate to a server.
- In the Name field, enter the name of the extended key usage.
- In the Object Identifier field, enter a unique string of decimal numbers to identify an object.
- From the Predefined values drop-down list, select Client Authentication.
15. Under the Enrollment Settings section, for the Renewal threshold (%) field, enter the percentage of the certificate lifetime that remains before the device requests renewal of the certificate. The recommended value in Microsoft Intune is 20%.
16. In the SCEP Server URLs field, enter the SCEP URL generated from Microsoft Cloud PKI’s Intermediate CA
17. In the Assignments section, include or exclude groups from the SCEP profile created.
18. In the Applicability Rules section, create and apply rules as applicable to the profile.
19. In the Review + Create section, review the profile set-up and click Create.
Create Wi-Fi Network Profile
- Go to Devices > Configuration > Create and select New Policy.
- On the Create a profile page select the required OS and from Profile type drop-down list, select Templates and then select Wi-Fi.
- On the Wi-Fi page, in the Basics section, enter the Wi-Fi’s name in the Name field.
- In the Description field, enter a suitable description for the Wi-Fi.
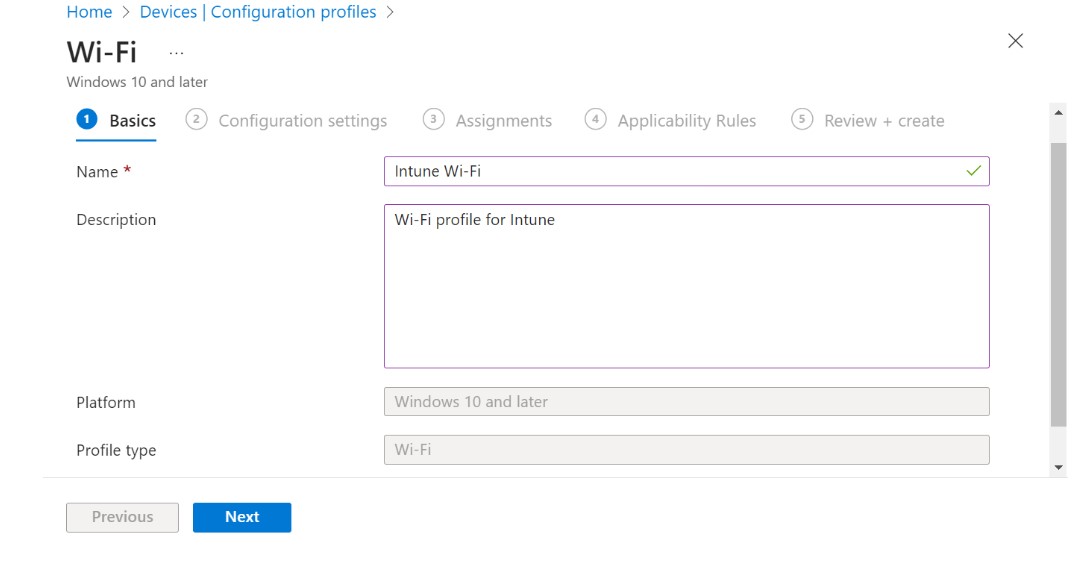
5. In the Configuration settings section, from the Wi-Fi type drop-down list, select any one of the following options:
Basic
Enterprise – recommended
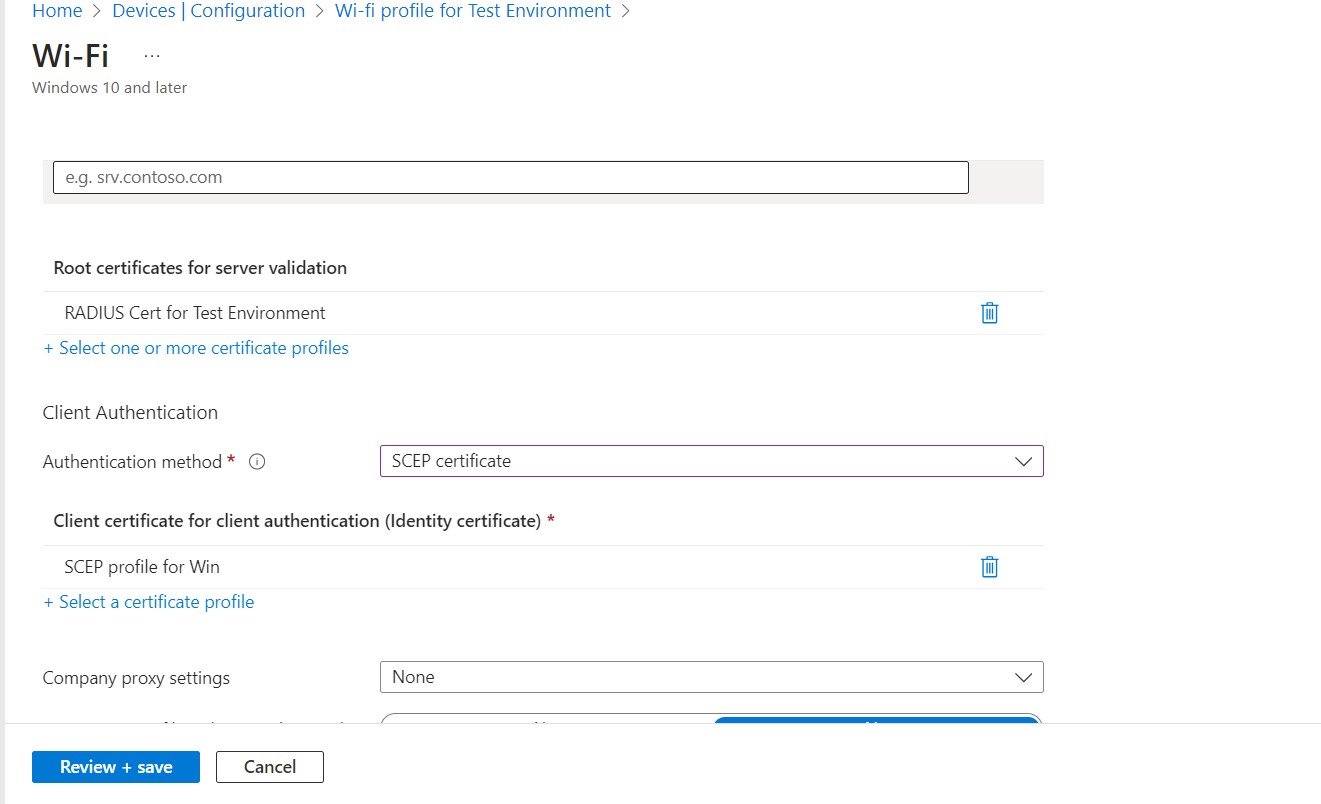
6. Configure your Wi-Fi settings. Select EAP type as EAP-TLS
7. Add your RADIUS Trusted Certificate profile in Root certificates for server validation
8. Select Client Authentication method as SCEP Certificate and select the relevant SCEP profile under Client certificate for client authentication (Identity certificate)
Set up Network Controller to use SecureW2’s Cloud RADIUS for authentication
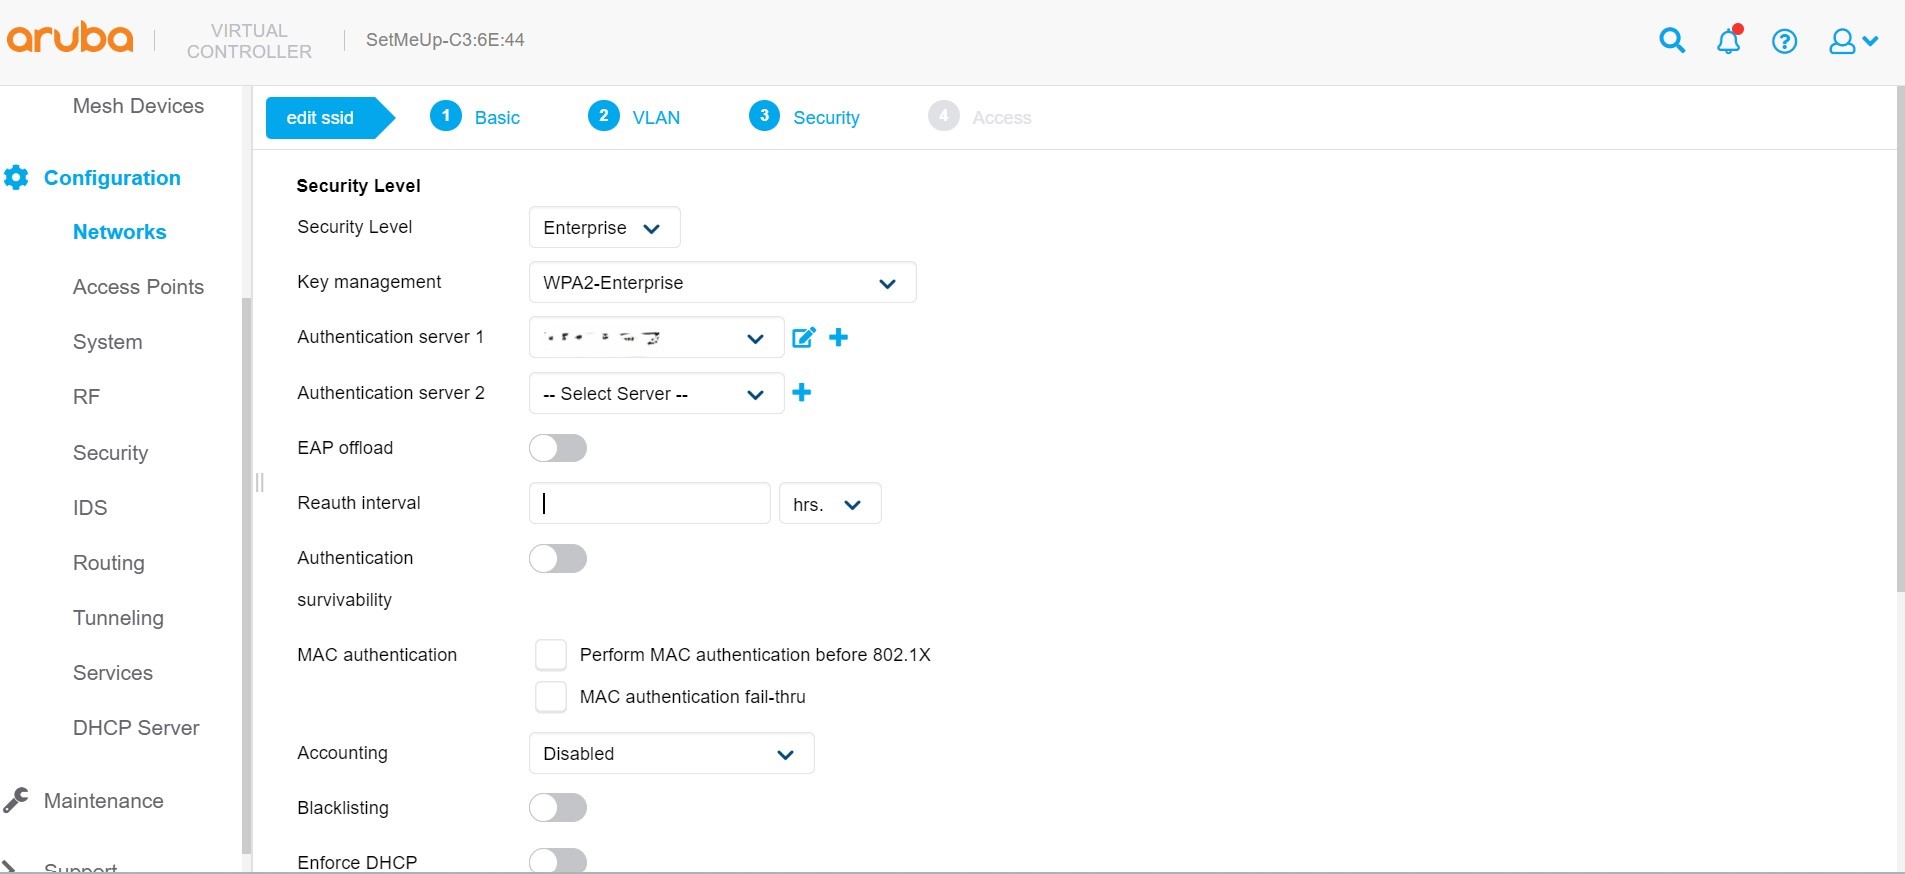
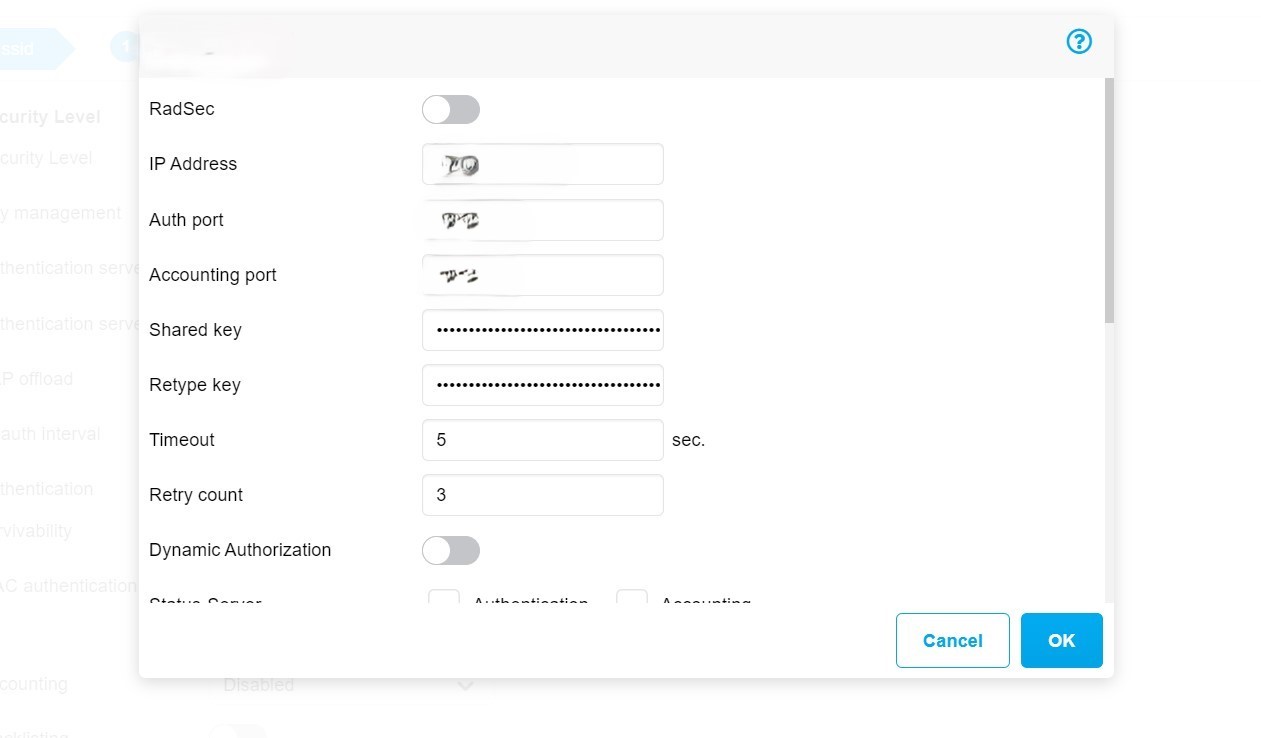
Configure SecureW2 Cloud RADIUS IP address and shared secret into your wireless controller. Aruba is shown as an example.
Goto RADIUS > Configuration. Note your IP address and port numbers of your RADIUS and put them onto your Wi-Fi controller.
Managing Certificate in an Enterprise Environment
While Microsoft Cloud PKI is great for organizations to get started on their journey of certificate-based authentication, the day-to-day management may be too for large organizations. We’ve been implementing and managing PKI for over a decade now, and these are a few things a large organization might want to consider before finalizing their PKI decision.
Over the years, we’ve found that it is very rare that organizations would have only one MDM to manage their devices. Microsoft Cloud PKI supports only devices that are managed by Intune which might be a risk if you want to secure devices that are not managed by Intune. We find that in an Enterprise environment, it’s very rare to see only one MDM. Many prefer to have one to manage Apple devices, and Google Workspace if they are supporting Chromebooks., Plus, there are BYODs and guest devices you might want to implement phishing-resistant authentication with. These are some of the reasons why JoinNow Connector PKI has enrollment methods for all of these devices.
This may seem obvious, but another point of consideration is the day-to-day management of certificates. Certificates are the keys to the castle. In an enterprise environment, it’s critical to have excellent visibility and automated forms of revocation and renewal. Microsoft Cloud PKI lacks capabilities like certificate templates and policies that automate the management of certificate lifecycles. If it was just annoying, or an efficiency concern that would be one thing. But mismanagement of certificates quickly becomes a security liability, which is why it’s so important to tightly monitor and automate certificate lifecycles.
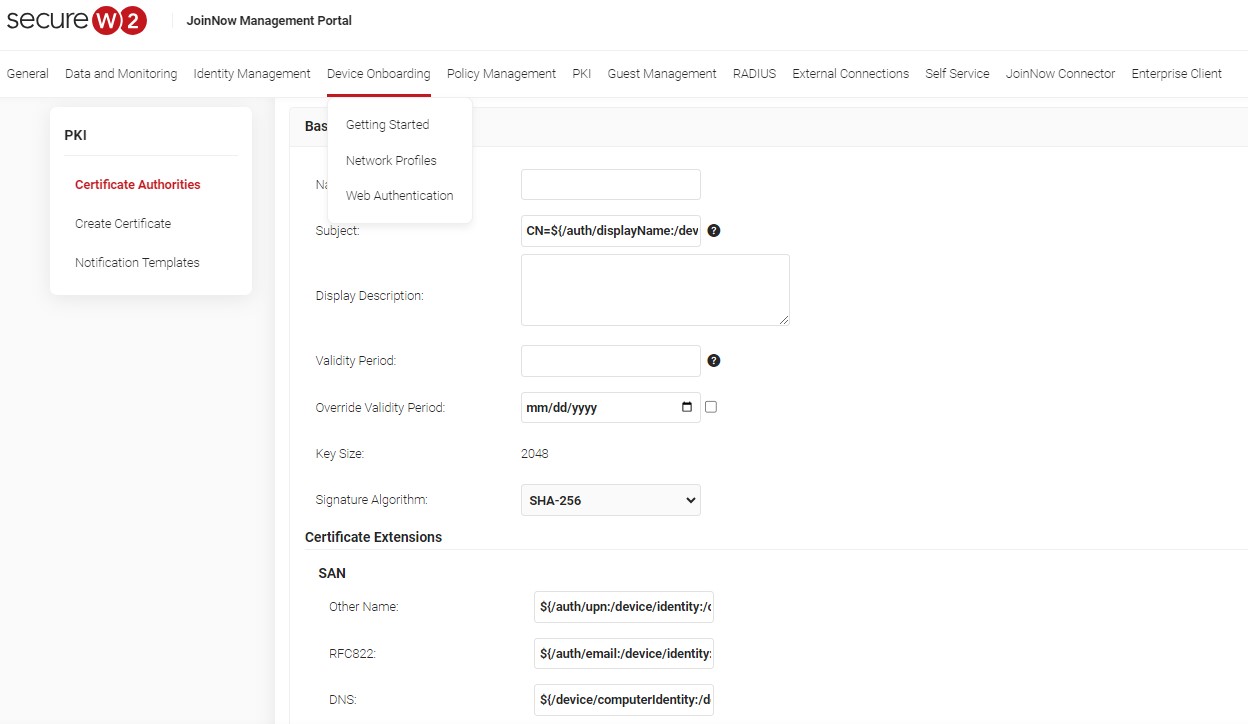
The last point is that there has begun to be more of a concern around methods of certificate issuance. For example, Microsoft Cloud PKI uses a static SCEP URL. This is quite common, and we don’t think the use of SCEP should deter any organizations from adopting certificates. The security pros far outweigh the cons. However, anyone with the wrong intentions can use this URL to get certificates and behave as a naive user accessing your secured information. Because of this, SecureW2’s PKI Services offer additional forms of validation like Apple MDA with ACME, Dynamic SCEP, and other technologies to help mitigate the risk of threats stealing certificates.
To conclude, Microsoft Cloud PKI is a great tool to kick-start your PKI journey and works well with our Cloud RADIUS platform. If you are stuck somewhere and need support click this link.